So hey everyone....miss me? Yeah, I really don't blog much anymore. :( ....as I am usually on Facebook. I will occasionally post on here though as we do more to the house. It's really slow going right now. Things will probably pick up though because we will be starting on Sis's tiny house this fall. I plan to post updates on it. Anyway.............................................
The reason for this post is not about blogging it is about the problem with some of my pictures on this here blog. I used to use Photobucket to edit and post my photos. That was a while back but all of the pictures I posted on here that were edited in Photobucket have been disabled from showing up on my blog. They have changed and are no longer a free hosting service and are wanting $400 a year for their services. I will not be paying that so my old photos will no longer show up on the blog. I am sorry for that. I could possibly go back and recover the pictures because they are still in my account on Photobucket but I really would have no clue where each of them belong on the blog so I am afraid it just isn't going to happen and I am totally ticked at Photobucket for this complete and udder disaster.
With that said, I apologize for the inconvenience and I also want to let you know that this will not happen with any future posts because I have my own editing software and load all my photos from disk now.
Until next time. Have a fabulous day!!!

Wednesday, July 19, 2017
Monday, April 10, 2017
KITCHEN REVEAL...SORTA...
Okay so I know you have been waiting for a long time and have been very patient for the final reveal of the kitchen remodel here at BTP. I know it's been a long time coming so today's the day....well sorta...I can't say this is the full and final reveal...but it's a good start. I am not finished accessorizing and really have not had time to get the professional camera out and do a full photo shoot so some of these are little grainy. Maybe in a few weeks I can get some better pictures. Until then I leave you with this...

and this...


We used the white shaker cabinets they have in stock at Home Depot and I really like them.


I love the big drawers for storage. You just pull them open and can see everything and get to everything easily. Trust me this is WAY better than having to dig for things or crawl into the cabinet trying to find what you need like we used to do.
On a little side note, the china cabinet is for sale so it will not be staying. I am sad to see it go because I hunted for one this particular style for a VERY, VERY long time it was something I really wanted. There's just no room for it now. :-(
On the brighter side, I love my new kitchen so much that I don't mind not having room for the china cabinet.

One of our favorite cabinets in the new kitchen is the cabinet with cube storage. Home Depot didn't have a pantry option for the specific size we needed for that side of the fridge so we rigged something up using small wall cabinets and cube storage towers. It worked out great and we love the extra storage for snacks....like I need snacks....hehe.
It even has some wine storage...or in our case...soda storage...

I still have to gather some things together for my new open shelves baking station so I will show all that later.
Well for the most part, there's the new kitchen. This is by far the biggest but best project we have ever done. We love our new kitchen and the openness of the space now. Coming home from work and cooking dinner in this house used to be a dread. Now it's a joy! I am so glad we decided to do this.
Monday, April 3, 2017
BLINGING UP THE KITCHEN CHANDELIER...
I know you have been waiting FOREVER for the full reveal of the new kitchen. Sorry I cannot show that yet but I promise it will be soon. We have been super busy...as always happens around this time of year...with extra things going on at church and with family so every Saturday (weekend) is pretty much a bust to get things done at home. That's just the way it goes sometimes! I did get a chance to work on blinging up the overhead light fixture in the kitchen though. YAY!!

The whole light fixture thing was somewhat of a debate. My SIL thought I should replace the old vintage light fixture (since I was replacing everything else) with something a little more fancy...to kind of go along with the chandelier in the dining room...and at first the hubs did too....UNTIL...he realized it would be him doing all the work to take the old fixture down and put a new one up. Then suddenly the old light fixture was plenty good enough. LOL!!
Truthfully...AND ODDLY...I wanted to keep the old fixture. It's original to this old house and the old bell type fixtures are back in style....farmhouse style...so there was no need to replace it.

We saved some moolah too so that's good but, I didn't think it would hurt to add a little bling to it...You know, to make my SIL happy and add a little blingy fanciness to the kitchen because it really does need something to tone down the industrial vibe I ended up with. Plus, I figured a little bling never hurt anything!!!!
This is kind of what I had in mind except for without the white crackle look...

The original chrome shade works better for me...though I could paint it later on if I need to.
I had a ton of leftover beads from stringing the dining room chandy so I used those and an old trivet similar to the one below that I found at the thrift store for $1 to add all my bling to the fixture without having to take it down....


The hubs cut out the center ring of the trivet so it would fit around the globe of the light fixture, then I propped it on a soda bottle to make it easier to hang the strands of beads on...


After looking at this I think I went a little sparse on beads but I mainly wanted to make sure this was going to work out before putting myself through any more work in it.

It worked great and I will be sure to add plenty more beads when I replace the frosted glass globe for a clear one later on. I am officially on the hunt for a clear globe. I hope it don't take me too long to find what I am looking for.
Well I guess that's it for today. I will be back soon with the full reveal....I PROMISE!!!!

The whole light fixture thing was somewhat of a debate. My SIL thought I should replace the old vintage light fixture (since I was replacing everything else) with something a little more fancy...to kind of go along with the chandelier in the dining room...and at first the hubs did too....UNTIL...he realized it would be him doing all the work to take the old fixture down and put a new one up. Then suddenly the old light fixture was plenty good enough. LOL!!
Truthfully...AND ODDLY...I wanted to keep the old fixture. It's original to this old house and the old bell type fixtures are back in style....farmhouse style...so there was no need to replace it.

We saved some moolah too so that's good but, I didn't think it would hurt to add a little bling to it...You know, to make my SIL happy and add a little blingy fanciness to the kitchen because it really does need something to tone down the industrial vibe I ended up with. Plus, I figured a little bling never hurt anything!!!!
This is kind of what I had in mind except for without the white crackle look...
The original chrome shade works better for me...though I could paint it later on if I need to.
I had a ton of leftover beads from stringing the dining room chandy so I used those and an old trivet similar to the one below that I found at the thrift store for $1 to add all my bling to the fixture without having to take it down....


The hubs cut out the center ring of the trivet so it would fit around the globe of the light fixture, then I propped it on a soda bottle to make it easier to hang the strands of beads on...


After looking at this I think I went a little sparse on beads but I mainly wanted to make sure this was going to work out before putting myself through any more work in it.

It worked great and I will be sure to add plenty more beads when I replace the frosted glass globe for a clear one later on. I am officially on the hunt for a clear globe. I hope it don't take me too long to find what I am looking for.
Well I guess that's it for today. I will be back soon with the full reveal....I PROMISE!!!!
Tuesday, March 21, 2017
BONUS POST...COUNTERTOP INSTALLATION...
You are in for a treat...TWO posts in one day! Boy am I on a roll...lol.
I charged my phone and was able to access the pictures of the counter top installation so I figured I would just go ahead and share instead of leave you hangin'.
I have to say it was a very interesting process. We ordered the stone through Home Depot and Home Depot in Manchester, Missouri subcontracts Hallmark Stone in Fenton, MO to do their installs. I have to say from start to finish I was VERY impressed with Hallmark. They made the install painless and were a pleasure to work with. I can't thank them enough for treating us so well.
They came out the first time and made a template for the counters...which like a dummy I didn't take any pictures of. SORRY!!!
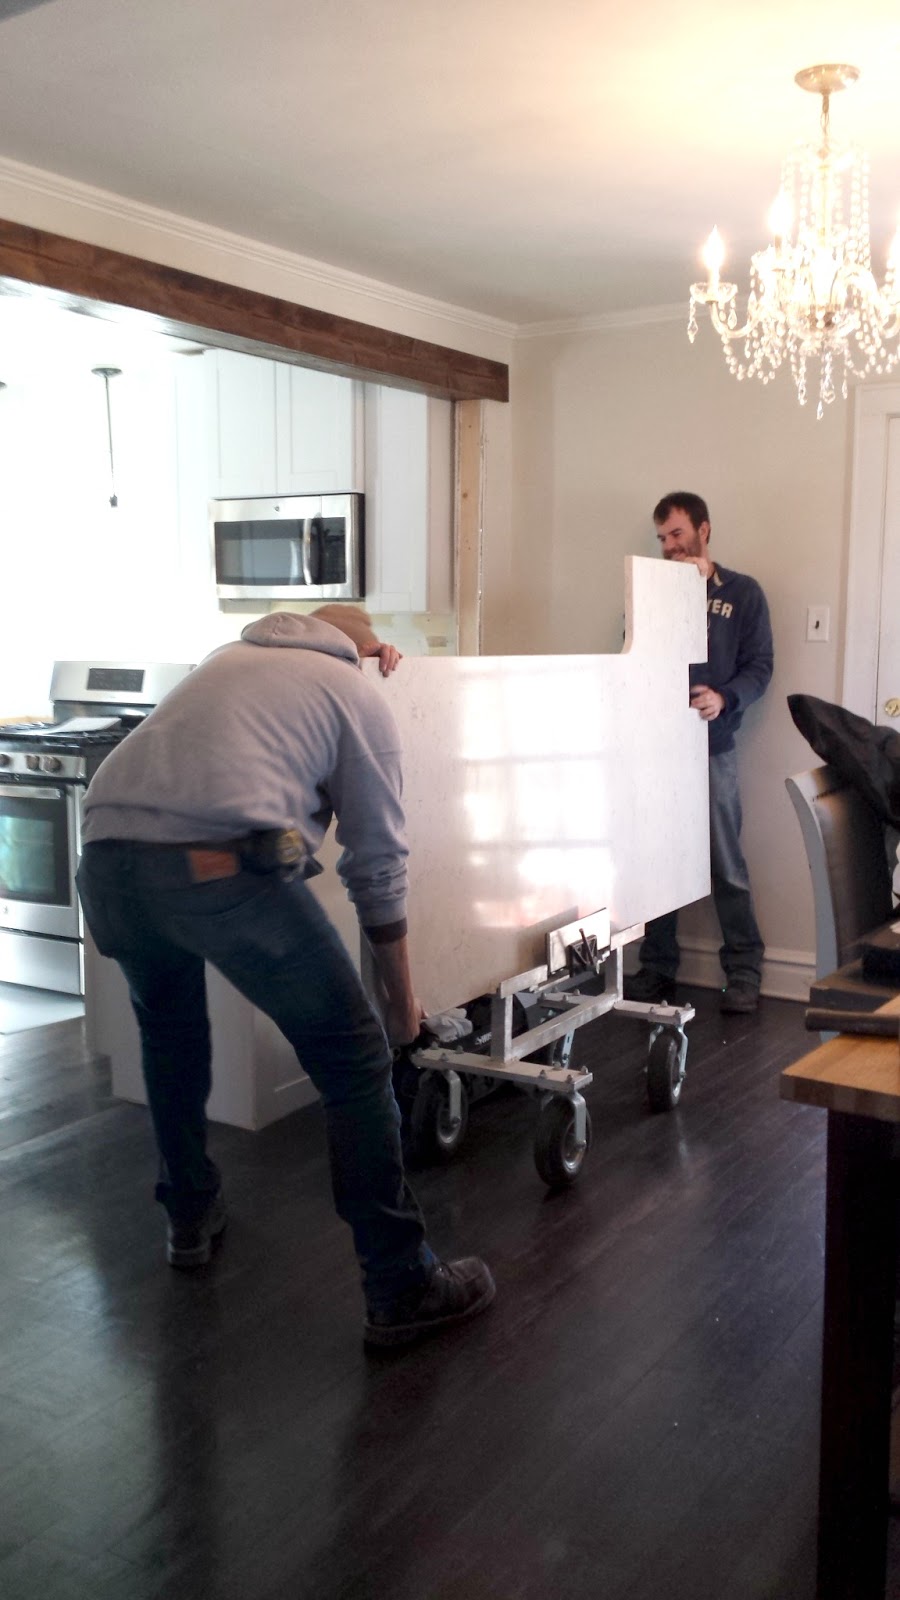
Two weeks later they came out and installed the custom cut quartz slabs.

The stone is so heavy they had to bring the slabs in the house on a cart.


Once inside the house it took two of them to set them in place and if the truth be told they probably could have used a third or fourth person.


All I can say is I hope these guys get paid good. They deserve it. Not only did the set the countertops in place. They installed my undermount sink, put in the bracket for the dishwasher and caulked everything. Now that is service. It's rare to find or get that kind of service these days.
I think the most impressive part in the whole thing is that the template guys were only at the house for about 30-45 minutes, maybe and hour and did PERFECT templating...and the cut stone was just as perfect...even where they had to notch out for the part of the wall we had to leave in on the peninsula. I really can't praise Hallmark Stone enough for a job well done.

I can't tell you how much I love them. Not only are they gorgeous but easy to use. Quartz is the most popular material of choice right now for countertops....even more so than granite. They are maintenance free and shouldn't stain, etch or scratch.
I'm tellin' ya, this is a dream come true for me. I hope they are worth the money...nearly $3000....GULP!!!! I KNOW, RIGHT? But they should last forever and since I went with a classic marble design they should never become outdated either.
Well there you have it....Silestone White Arabesque Quartz...fully installed and beautiful.
I charged my phone and was able to access the pictures of the counter top installation so I figured I would just go ahead and share instead of leave you hangin'.
I have to say it was a very interesting process. We ordered the stone through Home Depot and Home Depot in Manchester, Missouri subcontracts Hallmark Stone in Fenton, MO to do their installs. I have to say from start to finish I was VERY impressed with Hallmark. They made the install painless and were a pleasure to work with. I can't thank them enough for treating us so well.
They came out the first time and made a template for the counters...which like a dummy I didn't take any pictures of. SORRY!!!
Two weeks later they came out and installed the custom cut quartz slabs.

The stone is so heavy they had to bring the slabs in the house on a cart.


Once inside the house it took two of them to set them in place and if the truth be told they probably could have used a third or fourth person.

I think the most impressive part in the whole thing is that the template guys were only at the house for about 30-45 minutes, maybe and hour and did PERFECT templating...and the cut stone was just as perfect...even where they had to notch out for the part of the wall we had to leave in on the peninsula. I really can't praise Hallmark Stone enough for a job well done.

I can't tell you how much I love them. Not only are they gorgeous but easy to use. Quartz is the most popular material of choice right now for countertops....even more so than granite. They are maintenance free and shouldn't stain, etch or scratch.
I'm tellin' ya, this is a dream come true for me. I hope they are worth the money...nearly $3000....GULP!!!! I KNOW, RIGHT? But they should last forever and since I went with a classic marble design they should never become outdated either.
Well there you have it....Silestone White Arabesque Quartz...fully installed and beautiful.
KITCHEN REMODEL...COUNTERTOPS & BACKSPLASH...
This post should have been written a week ago but I've been too lazy to take pics. As a matter of fact I still have not taken pics. The ones you are going to see today are from the hubs' phone...which means they aren't very good. :).
As you know the counters were installed a week ago this past Friday. It was a very exciting day to say the least. I took pics of the installation but I will have to share those later because they are on my phone....which is dead at the moment. LOL.
Anyway, without further ado, here are a few pics of the counters and backsplash.

I still have to grout. I started last night and got about halfway done and ran out of grout...I bought the premixed which was probably a mistake. It said it would cover 50 sq. ft. Well, I don't know how they measure sq. ft. but it only covered about 8 of my sq. ft....so now I have to make another trip to the store. Yay me!
The counters are White Arabesque Quartz from Silestone and they are GORGEOUS!!! Best choice ever! Hallmark Stone in Fenton, Missouri templated and installed and I can't say well enough about them. They were super nice and did an awesome job. The templating process took about an hour and then the install took about another hour. Super fast and I have to tell you I was impressed with everything from start to finish. I would definitely recommend them to anyone putting stone counters in. Okay so enough about that....
They installed the undermount sink while they were there and then hubs installed the faucet and stuff. It's really great to having running water again. I missed it much.

One...just one...of my favorite parts that we did in this kitchen was install an outlet with USB ports. It was expensive $26 but well worth it as I know it will be used A LOT!!! Really there is no excuse for my cell phone to be dead right now. Ooooops!!!! Hehe

Well with the counters in place we are now COOKING in this kitchen. Cooking with GAS! It's been great and with the layout and design of this kitchen now I have plenty of prep space.

Maybe in the future I will share some cooking videos. That would be fun!! I have just a few finishing touches...some painting mainly...and this kitchen remodel will be done. YAY!!!
I will be sure to share pretty full view pics as soon as I get everything finished up.
Until then, have a fantastic life.
Ciao,
Monday, March 6, 2017
KITCHEN REMODEL...PART 2....PHASE 3...THE FRIDGE SIDE...
Okay, we made some serious progress on the kitchen in the past week. We got the last of the cabinets installed and pretty much all the appliances in too. Let me just tell ya, getting the fridge in the house was a nightmare. Not only was it the coldest and windiest night of the year, at midnight we were taking the door off the house and still had some issues with the screen door as well. What a complete mess....definitely not something I want to do again. Haha...but we got it in and all is well!
Anyway, all we really have left to do on our part until the countertops go in on Friday is some finishing work. Lots of caulking and painting. O JOY!!! Once the counters go in we can install the backsplash, sink, faucet and dishwasher and this kitchen remodel will be DONE!!! Yay!.
Now my kitchen is very small and very specific when it comes to measurements for things like cabinets on the refrigerator side of the room. I wanted to have a pantry on either side of the fridge but there were limited size options for pantries in the Hampton Bay line of cabinets so I only had enough room for one pantry...with about 12" of space left over so I had to get creative when it came to making everything fit and had to do somewhat of a custom build on the one side of the fridge. I used a couple 12" cabinets, some cube systems and a whole lot of trim but I think once it's all painted out, it's gonna look nice.

I had a hard time finding baskets in the size and color I wanted but I think these cute Ikat print bins will work out just fine, though they are a little smaller than what I wanted.

They will hold things like bread, snacks, etc. and I think we are going to like using them.
We got the toekicks on and most of the hardware installed over the weekend.

I still have to put knobs on the cabinet doors which will only take a few minutes.
We got the peninsula finished out too.
 I trimmed it out in the shaker style to kind of mimic the cabinets.I really like how it turned out. Now
all that's left to do there is some painting.

Well that's it for now. I probably won't be back until everything is finished which I hope to be next Monday or Tuesday.
Though this is something I have wanted to do for a long time, I will be SOOOOOO glad to get this job behind us. It's looking really good and I can't wait to start using this kitchen.
What do you think out first meal should be? Any recipe suggestions?
Anyway, all we really have left to do on our part until the countertops go in on Friday is some finishing work. Lots of caulking and painting. O JOY!!! Once the counters go in we can install the backsplash, sink, faucet and dishwasher and this kitchen remodel will be DONE!!! Yay!.
Now my kitchen is very small and very specific when it comes to measurements for things like cabinets on the refrigerator side of the room. I wanted to have a pantry on either side of the fridge but there were limited size options for pantries in the Hampton Bay line of cabinets so I only had enough room for one pantry...with about 12" of space left over so I had to get creative when it came to making everything fit and had to do somewhat of a custom build on the one side of the fridge. I used a couple 12" cabinets, some cube systems and a whole lot of trim but I think once it's all painted out, it's gonna look nice.

I had a hard time finding baskets in the size and color I wanted but I think these cute Ikat print bins will work out just fine, though they are a little smaller than what I wanted.

They will hold things like bread, snacks, etc. and I think we are going to like using them.
We got the toekicks on and most of the hardware installed over the weekend.

I still have to put knobs on the cabinet doors which will only take a few minutes.
We got the peninsula finished out too.

all that's left to do there is some painting.

Well that's it for now. I probably won't be back until everything is finished which I hope to be next Monday or Tuesday.
Though this is something I have wanted to do for a long time, I will be SOOOOOO glad to get this job behind us. It's looking really good and I can't wait to start using this kitchen.
What do you think out first meal should be? Any recipe suggestions?
Thursday, February 23, 2017
KITCHEN REMODEL PART 2, PHASE 2...CABINETS & LIGHTS...
I guess you could say this is a quick little mini post as I just wanted to share a peek at the new lights we put over the sink area. They are the Urban Renewal Rustic Iron mini pendant by Feiss. I think they probably hang down just a little too low but we really only had a couple of choices in length...either too short or too long. I liked the longer look better so that's what we went with.


While we are on the subject of lighting, I haven't decided whether or not I want to replace the original light hanging in the center of the room with something else or if I want to keep what's there. The hubs and his sister seem to think I should get something new but I am kind of partial to the original fixture and may just try to find a way to bling it up a little. Not sure yet. What do you think I should do? Get something new or keep what's there?
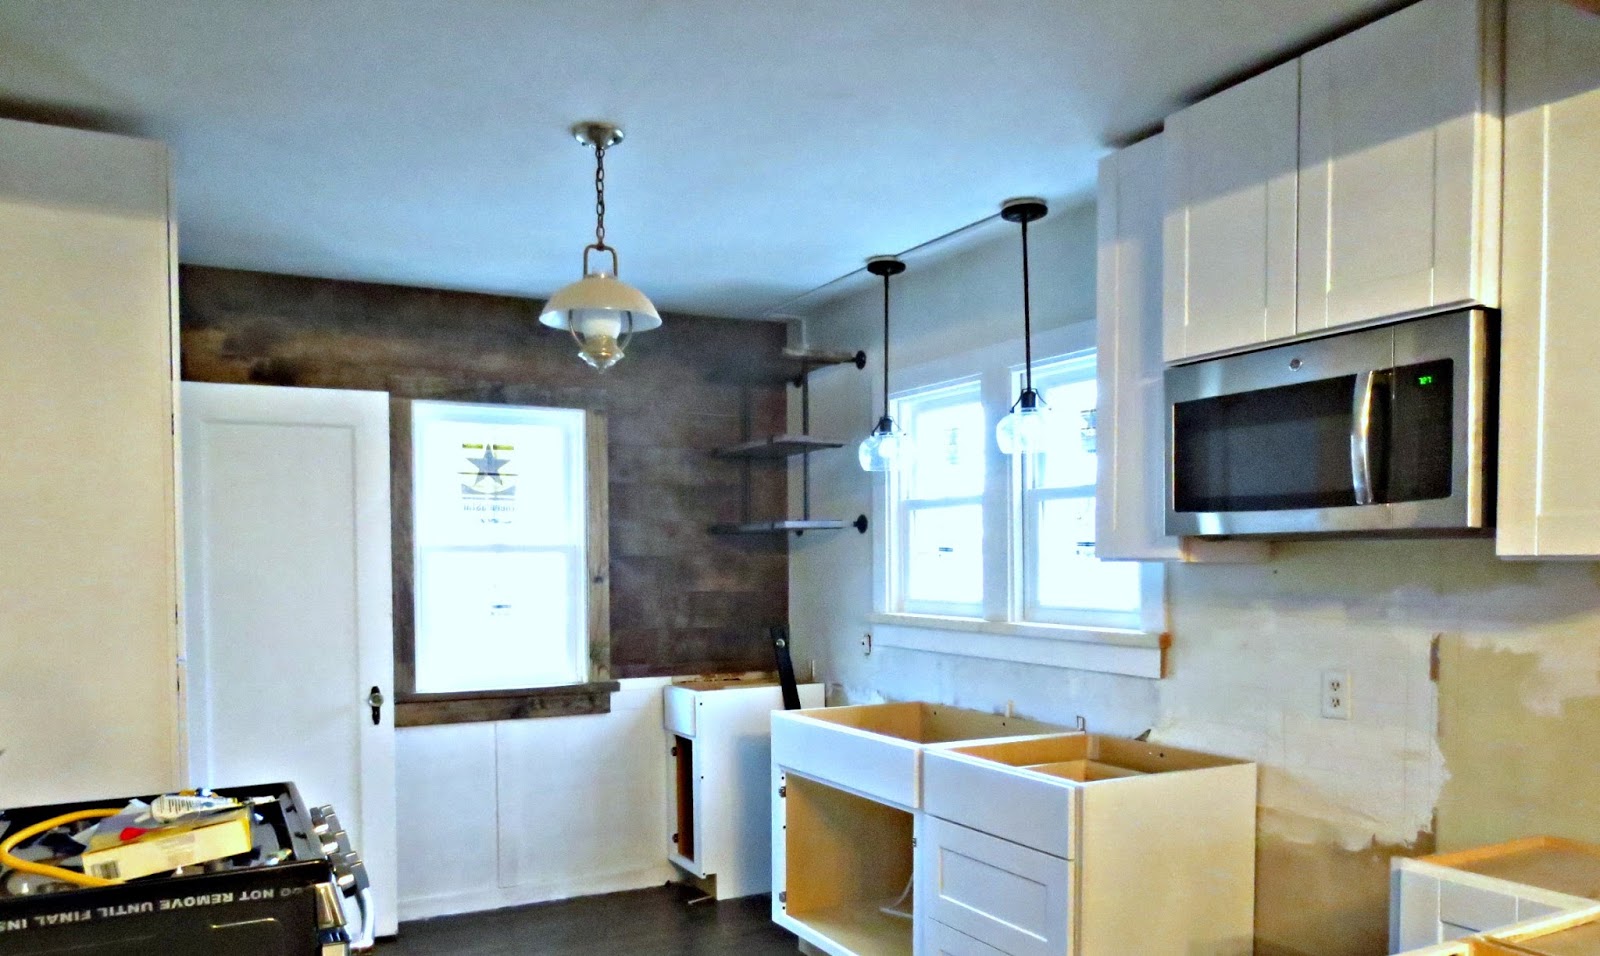
In other news, you may have noticed that we finished installing the rest of the base cabinets the other night. We haven't put the doors on because of plumbing work that needs to be done for the sink. The stove will be installed tonight, and the Silestone Quartz guys will be here in the morning to measure for countertops. Yay!!!!
We still cabinets to install on the refrigerator side of the room and we will be picking up the new fridge Saturday. I think I can safely say we will be wrapping this project up in the next couple of weeks. I can't wait!!
Well, like I said a short mini post, but that's pretty much it for today.
I will be sure to keep you updated.
Ciao,

While we are on the subject of lighting, I haven't decided whether or not I want to replace the original light hanging in the center of the room with something else or if I want to keep what's there. The hubs and his sister seem to think I should get something new but I am kind of partial to the original fixture and may just try to find a way to bling it up a little. Not sure yet. What do you think I should do? Get something new or keep what's there?
In other news, you may have noticed that we finished installing the rest of the base cabinets the other night. We haven't put the doors on because of plumbing work that needs to be done for the sink. The stove will be installed tonight, and the Silestone Quartz guys will be here in the morning to measure for countertops. Yay!!!!
We still cabinets to install on the refrigerator side of the room and we will be picking up the new fridge Saturday. I think I can safely say we will be wrapping this project up in the next couple of weeks. I can't wait!!
Well, like I said a short mini post, but that's pretty much it for today.
I will be sure to keep you updated.
Ciao,
Tuesday, February 21, 2017
KITCHEN REMODEL PART 2...
So the phase of taking out the wall and doing the floors is done.....THANK GOD!!!! Phase two is now underway. We had a long weekend so we got some things done...not as much as I was hoping...but quite a bit nonetheless.
Friday was spent trimming out the entry way, ripping, staining and hanging luan plywood on the accent wall, and then installing window trim. There was a LOT of measuring, marking, cutting and nailing going on Friday. While I believe a master carpenter could have gotten this done a lot faster, this was an all day job for the hubs and I.

We took a break on Saturday from any carpentry work because we had to make a trip to Home Depot to pick up our appliances. The orders got messed up and they couldn't deliver them to the house. Figures, right? I guess that worked out to be a good thing because I decided not to take the refrigerator I had ordered. I didn't realize it would stick out from the wall nearly 40 inches....WAY TOO BIG...so I decided to go ahead and order a counter depth fridge instead. The hubs was kind of miffed and said we should just take the one I had ordered while it was there...BUT...I figured it's better to go through the extra wait time and frustration now then to be unhappy and miserable with a fridge that juts out into the room too far. We are only doing this once so I want to make sure I am happy with the end result.
We are working on a deadline to get the cabinets installed as we already ordered the countertops and the company needs to come out and take measurements; so, Sunday we started placing and installing the wall cabinets. They were pretty easy to hang, level and screw in. We were lucky to have studs pretty much where we needed them.

Once those were up the hubs decided that we should install the microwave before we placed any of the base cabinets. I agreed, so we unpacked the microwave, read the installation instructions and hung the bracket. That part was pretty easy but then we needed to put the charcoal filter into the microwave. Things went downhill from there. We couldn't get the little door off to insert the filter. It took over an hour for us to pry it off and we were afraid of breaking it. There would be nothing worse than taring up a brand new (expensive) microwave. We finally broke the door loose and installed the filter but then had trouble getting the little door back on right. That took another 1/2 hour. I'm telling you we were both about to pull our hair out. I can't understand why the company didn't just install the filter when they were assembling the dumb microwave in the first place. Go figure. It's like they decided to purposefully make it hard on the consumer.
Next we had to tape the paper template to the underside of the cabinet to drill the holes to hang the microwave. It was nearly impossible to get that X@#X$% piece of paper to stick to the underside of the cabinet right...so let's just say that my patience was wearing quite thin and I probably mumbled...or perhaps screamed...a few vulgarities and then had to repent. Ooops!!! Again, I can't understand why the company didn't make the template where you could simply lay it inside the cabinet and drill down to make the needed holes. It would make more sense that way!! These companies make everything so difficult!!!! Anyway, altogether it took about 4 hours just to hang the stupid microwave. After that we put up our tools and called it a day!

Yesterday we installed some of the base cabinets. It was another long and problem laden day...that included a really funny incident with the shut off valve on the cold water pipe coming open and spraying the hubs in the face...and wetting half the kitchen down. Hehehe!! Besides that, we did manage to get the peninsula cabinets installed and the open shelves hung.


Ciao,
Friday was spent trimming out the entry way, ripping, staining and hanging luan plywood on the accent wall, and then installing window trim. There was a LOT of measuring, marking, cutting and nailing going on Friday. While I believe a master carpenter could have gotten this done a lot faster, this was an all day job for the hubs and I.

We took a break on Saturday from any carpentry work because we had to make a trip to Home Depot to pick up our appliances. The orders got messed up and they couldn't deliver them to the house. Figures, right? I guess that worked out to be a good thing because I decided not to take the refrigerator I had ordered. I didn't realize it would stick out from the wall nearly 40 inches....WAY TOO BIG...so I decided to go ahead and order a counter depth fridge instead. The hubs was kind of miffed and said we should just take the one I had ordered while it was there...BUT...I figured it's better to go through the extra wait time and frustration now then to be unhappy and miserable with a fridge that juts out into the room too far. We are only doing this once so I want to make sure I am happy with the end result.
We are working on a deadline to get the cabinets installed as we already ordered the countertops and the company needs to come out and take measurements; so, Sunday we started placing and installing the wall cabinets. They were pretty easy to hang, level and screw in. We were lucky to have studs pretty much where we needed them.

Once those were up the hubs decided that we should install the microwave before we placed any of the base cabinets. I agreed, so we unpacked the microwave, read the installation instructions and hung the bracket. That part was pretty easy but then we needed to put the charcoal filter into the microwave. Things went downhill from there. We couldn't get the little door off to insert the filter. It took over an hour for us to pry it off and we were afraid of breaking it. There would be nothing worse than taring up a brand new (expensive) microwave. We finally broke the door loose and installed the filter but then had trouble getting the little door back on right. That took another 1/2 hour. I'm telling you we were both about to pull our hair out. I can't understand why the company didn't just install the filter when they were assembling the dumb microwave in the first place. Go figure. It's like they decided to purposefully make it hard on the consumer.
Next we had to tape the paper template to the underside of the cabinet to drill the holes to hang the microwave. It was nearly impossible to get that X@#X$% piece of paper to stick to the underside of the cabinet right...so let's just say that my patience was wearing quite thin and I probably mumbled...or perhaps screamed...a few vulgarities and then had to repent. Ooops!!! Again, I can't understand why the company didn't make the template where you could simply lay it inside the cabinet and drill down to make the needed holes. It would make more sense that way!! These companies make everything so difficult!!!! Anyway, altogether it took about 4 hours just to hang the stupid microwave. After that we put up our tools and called it a day!

Yesterday we installed some of the base cabinets. It was another long and problem laden day...that included a really funny incident with the shut off valve on the cold water pipe coming open and spraying the hubs in the face...and wetting half the kitchen down. Hehehe!! Besides that, we did manage to get the peninsula cabinets installed and the open shelves hung.


We will be tackling the rest of the base cabinets tonight and will hopefully be ready to call the countertop installers by the end of the week.
I promise to keep you updated!!!
Ciao,
Friday, February 10, 2017
KITCHEN REMODEL...THIS WEEKS PROGRESS...
Well things certainly seem to be moving slow but we have made a WEE LITTLE progress this week. The wall opening we created has been drywalled, taped, mudded, sanded and painted.

I am not a professional drywaller but I think I did a pretty good job. Most of the surround will be covered in trim anyway, so no one will notice the imperfections in my work on that. I did make sure the exposed areas were nice and tidy. ;)
I did not install any trim like I was planning because I have pretty much decided it was best to do all that last. We need to get the cabinets and counters in place before the one side of the opening can be finished, so it was just best to wait on all the trim work.
Some GREAT news is that all the carpenter glue came off the hardwood floors we uncovered. We used super hot water and a buffer with sanding screen...That's it, no chemicals and no scraping or scrubbing. I couldn't believe it!!! It worked like a charm and now we are ready to give it all a final sand and then we will stain and seal it. I am SUPER THRILLED this all worked as I really did not want to use laminate.


The windows we ordered came in the other day and we got them installed this week. I am SUPER, SUPER EXCITED about these. They are double hung windows, which mean both the top and bottom windows tilt in for cleaning. I can't express enough how happy that makes me. Cleaning our 78 year old windows....running in and out of the house and climbing up and down the latter...and spending A WHOLE DAY cleaning windows is a serious drag!!!!!!!!!!!!!!!!!!!!!!!!!!!!! These will make that job SOOOO much easier!

AND THE BIGGEST NEWS this week....our new cabinets arrived yesterday....YAAAAYYY.


We purchased the Hampton Bay prefinished white shaker style cabinets from Home Depot. They are GORGEOUS. I wish I had a better picture to show you but we have not unpacked any of them yet.
I only wish we were ready to install them but, we still have lots to do. The main thing holding us up is getting the floors finished. We will be working on that over the weekend and hopefully we will be ready to install the cabinets by next weekend. We shall see!
Anyway, I will be sure to keep you updated.
Ciao,
Subscribe to:
Posts (Atom)
