Hey all, how are you this fine crisp fall morning? I'm great, thanks.
Do you remember last week in my post about loving paper that I told y'all I had a paper project that you would not want to miss? Well, here it is...
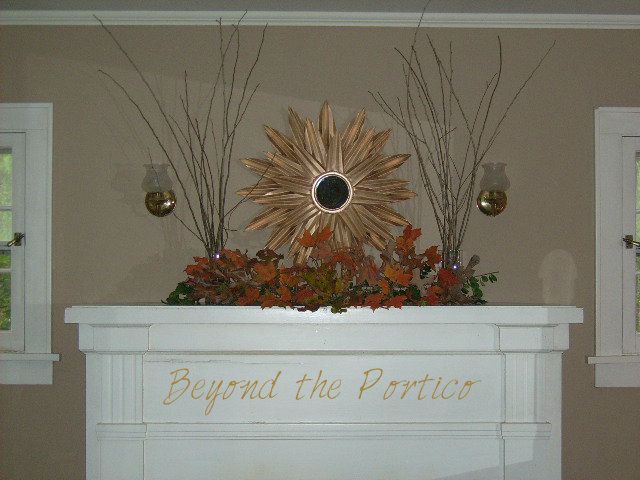
Do you guys love sunburst mirrors? I do too! I have been spotting them everywhere and have wanted one for a long time, but they are crazy expensive as you all are aware, so I decided to make one. I have been inspired by the many gorgeous ones made by all you DIYers out there and decided it was time for me to attempt my own.
Here is my inspiration piece...
I saved this picture a few weeks back because I wanted to pretty much copy it but I forgot to write down the source and now I can't find it again. I believe this one is made of light weight metal and runs, if I remember correctly, around $375.00 which is absurd! I thinks Kirklands sells one similar for around $60 which I guess isn't bad but I think mine turned out looking just as good and it cost me less than $5 to make and only took a few hours of my time...
What do you think? Did I do well?
Well, now you can see the beginnings of my fall mantle...which I will show in more detail along with my other fall decor later in the week...so be sure to come back.
For now, how about a TUTORIAL on how I made this beauty...
I took my cue from
The Nester and used paper for mine too. However, instead of poster board, I used plain white 8 1/2" x 11" cardstock because I already had it on hand. I think this worked better for my design rather than poster board because it was more pliable for all the folds I needed to make.
If you would like to make one of these for yourself, here is what you will need:
- 16 sheets plain white cardstock (each sheet makes two "rays")
- 4 cardboard circles (I used the backs of legal pads which I had on hand)
- 1 5" mirror (mine was out of a hand mirror purchased from the beauty section at Dollar General)
- 1 Cool Whip lid (this will be your frame for the mirror)
- glue gun
- glue sticks
- 12" strand of small plastic craft pearls (or in my case bb's, what I had on hand)
- 15" piece of rope or cording
- Gold spray paint (or color of your choosing)
- Dark colored stain
This is really very simple to make. Using your cool whip lid as a template draw four circles on your cardboard and cut them out. On each of three circles you will make lines as guidelines to position your "sun rays". Draw 16 lines on one of the circles and eight lines each on two other circles. The last circle should be glued into the underside of the lid for added support.
Next it's time to make your "sun rays". I made three different sizes. 16 large (11" x 4"), 8 medium (9 1/2" x 3 1/4") and 8 small (8" x 2 1/2"). These measurements are approximations. This thing does not have to be perfect to look good. You simply need three different sizes.
Fold each sheet of your cardstock in half lengthwise. On three separate sheets draw on your three different size "rays". Cut them out. These will be your template for the rest of your "rays".
Once all of your "rays" have been cut, it's time to fold them (like you are making a homemade paper fan). Fold each one down the center and then fold each side back and forth into a fan shape.
Now on to the fun part...putting it all together.
Start with the circle with 16 lines and start gluing your largest "rays" to it. You will position the center line of the "ray" onto one line on your circle. Work in fours and glue them directly across from each other on the circle...
Note: This one has 16 "rays", two layers (not shown) when it is complete. Now it's time to glue the medium "rays" onto one of the cardboard circles which has eight lines. Glue these on in the same fashion, working in fours and gluing directly across from one another. Next glue the small "rays" onto your last circle.
You should now have three separate flower-like shapes.
I did mine in three separate shapes because I wanted to spray paint it and this made it easier....but before you grab the paint can, there are a few more steps.
Glue your Cool Whip lid to the center of your smallest shape.
Next glue your strand of craft pearls to the inside lip of your lid (in my case bb's because it's what I had). This is because your mirror is slightly smaller than the inside of your lid and you will want a nice, tight little nest to glue your mirror into later.
Next glue your piece of rope around the outer perimeter of the lid. This is to just to add a little extra thickness and texture to your frame but is completely optional.
Okay now it's time to paint...paint the bottoms first and let them dry. The nice thing about spray painting paper is that it dries quickly (about 5 minutes per side). Now turn them over and spray paint the fronts and let them dry.
Now it's time to apply a little stain. Blotch it on lightly in different areas (usually on your tips and ridges) to give everything a little "patina". I used Old English because that's what I had on hand but regular wood stain would be better. My "patina" is not quite as dark and prominent as I wanted but this did work in a pinch.
Okay, almost done. Now glue your medium sized shape onto the middle of the large shape. When the glue is set, glue the smallest shape onto the middle of the medium shape. Glue a paperclip onto the back for a hanger.
The final step...glue your mirror into the center of your frame (cool whip lid)...clean with Windex and VIOLA' one very beautiful, incredibly inexpensive (yet very rich looking) SUNBURST MIRROR.
Looking at the details...
Sharing at:
Between Naps on The Porch
Coastal Charm
My Uncommon Slice of Suburbia
2805
No Minimalist Here
Savvy Southern Style
At the Picket Fence
From My Front Porch To Yours
Imparting Grace
The Shabby Nest