Tuesday, June 30, 2015

THE LONG AWAITED DEBUT OF THE DIY DRIFTWOOD MIRROR...

Well it's done! The DIY round driftwood mirror is FINALLY done! It took a month of Sundays (or more) to complete but it's DONE!!

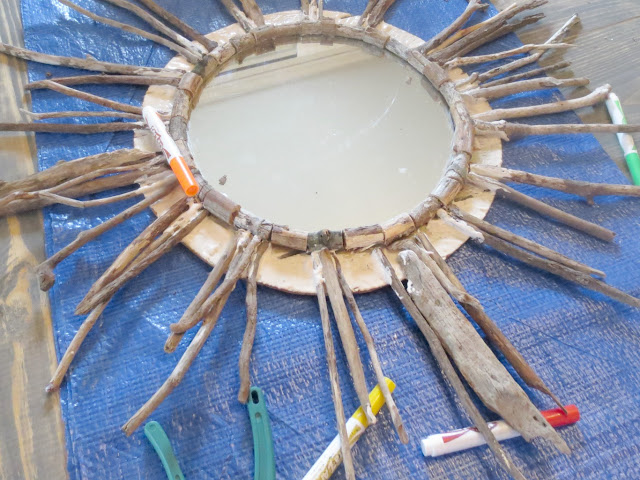
It took a while to gather all the driftwood needed (probably around 150 - 200 pieces total). Yes, that much!!, and thanks to the recent flooding that I talked about HERE, I was able to gather it up much sooner than expected.  YAY!!

Then there was the gluing...then waiting for the glue to dry...then gluing some more and waiting for the glue to dry again....and again.  Yes, this project was one that took much patience but the end result is well worth it.  Well here, see for yourself...


I do have to apologize for the pictures...


There really are NO good ones as this porch is just tooooooo tiny to get any good shots, but...IT IS WHAT IT IS!!  Besides a camera just cannot show you the beauty and clarity that the naked eye can; so, to see this GORGEOUS mirror in all it's glory, you are just gonna have to come over for a visit. The porch is pretty much done (just a couple finishing touches left) so don't hesitate to stop by for a chat. We'll sit and talk about the lovely weather we're having, sip on some sweet, ice cold tea, and oooh and ahhh over just how pretty this mirror...and the porch...really is.


The mirror was a totally FREE project. I already had the 12" round mirror. Of course you know the driftwood was free and I had a piece of 1/4" thick wood paneling in my stash that I used for the backing.  So yes, a totally FREE mirror which is a GREAT deal when you consider that you can't touch a driftwood mirror of any kind in the stores or on the internet for under $100.


It doesn't look very big on the wall but it actually is quite large, around 36" in diameter or so and is a very quality piece. I couldn't be happier with it.


From this vantage point you can get kind of a full view of the porch...with mirror...and a little peek at the flower bed that runs around this side of the house (oh and peeling and chipping siding that we are going to have to fix this fall). I still plan on showing you the whole flower bed but just haven't had a chance yet.


Of course as you can tell I need a few more plants on this side and to do a little tweaking but that's gonna have to wait a while. Vacations coming!! The good news is, the cardboard weed barrier is doing a FABULOUS job!! YAYYY!!

Oh, but we were talking about that GORGEOUS mirror, weren't we?


I am genuinely thrilled with how this project turned out. Truthfully, I am quite proud of it because it was something I really wanted and I saved a TON of money by making it myself. That's why I love DIY so much. Plus it's a quality piece that was made right and is going to last a while. I put quite a lot of time, effort and GLUE (a whole bottle of Elmer's wood glue, hehe) into this piece and it really shows.

So, why don't you come on by the porch sometime and have a real look at it!  I'll be here enjoying the lovely weather and the view.

Have a great day, friend!!


Sharing at:

Thrifty Decor Chick
Home Remedies
Bless'er House
Coastal Charm
Savvy Southern Style
Cedar Hill Farmhouse
No Minimalist Here
Imparting Grace
From My Front Porch To Yours

Monday, June 29, 2015

SATURDAY'S DAY TRIP...SANDY CREEK COVERED BRIDGE...

Have I ever told you that I LOVE covered bridges?  Well, I do!


They are one of my most favorite things in the whole wide world. Not sure why. I just find them so interesting and beautiful. I always imagine the days in the life of an era gone by or that there's a great adventure or secret garden that lies just beyond.  You know, kind of like the light at the end of the tunnel thing. I'm just SOOO curious of what's out there!


Missouri has four covered bridges to enjoy. At one time I think there was around 28 total in the state but through the years most were either torn down because of deterioration, washed away by a flood, caught fire or some other disaster but there are four left and they are now state property so they are preserved as historic sights and protected.


I have decided that this summer I want to see ALL of them (though that's not saying I am going to get to, hahaha). One of them is about 4 hours away from home so I may not make it to that one.  I'm going to try to though. The hubs don't want to travel that far just to see an old bridge (though he would for a fishing trip. Ugh!) so I am going to have to work on him a bit. I think I might get my way, but we'll see. Hehehe.

Several years ago we visited the one near Paris, Missouri but back then I didn't blog and I don't think I took pictures. If I did it was probably with one of those disposable cameras so who knows where the pictures would be now. The great news; however, is that we will be traveling to the Paris, Missouri area in a few weeks on our vacation...YAY!!!...so I will be sure to take pictures this time around...of course you know I will share them with you!

This past weekend the weather was superb and so after cleaning the church we decided that we should take advantage of the weather and take a little day trip with the kids. As I was cleaning I was pondering where we could go that we have never been before, that was fairly close to home and that wouldn't cost a lot.  Then it hit me, the Sandy Creek covered bridge was only a little more than an hour away, it was totally free to enjoy and we had never been there. It was PERFECT for a day trip! So we gathered up a little picnic food, filled up the gas tank and was on our way!


The bridge was totally GORGEOUS and the area even more beautiful than I could've imagined.


I had told bubs to take his swimming clothes just in case there was a place to swim, but the hubs said that I shouldn't have made any promises and that he was probably going to be disappointed. To which I replied, "Bridges usually do span water, you know!".  Low and behold there was a sweet, clear and shallow little creek flowing beneath the bridge that was just perfect for wading. I couldn't help but say "I told you so!"  You know how I am.  Hehe.


Anyway, the guys...both of them...decided to take a little swim (apparently the hubs brought his swimming attire too, probably because he knew I was right! Haha). We girls were all totally lady like and just dipped our toes. The water was COLD!!! Brrr.


After playing we ate a little lunch at our picnic spot with a view of the bridge...


It was a nice shady spot.

After lunch we took a little walk and played some more...


Notice bubs did not get his picture taken by the bridge.  Yeah, it's because he was more interested in the water than any ol' bridge!


After all that, we headed over to Mastadon State Park and museum, which we found out was only about 15 minutes away.


It was a neat little place where we got a glimpse of life that existed before civilization in Missouri as we know it today. In the Imperial, Kimmswick area of Missouri there was a Mastodon bone bed found several years ago.  It gave evidence to life that was here before us.

We got to learn about the Indian tribe that had lived in the area...


Found out that there was a creature (a large ground sloth) that was said to have roamed the local forests....


Not sure I believe that one!, and got to see a replica skeleton of a large, full size male Mastodon....it was HUGE!!...


Pretty cool!

Bubs liked the sundial they had at the entrance of the museum the most because it was something he learned about at school.


Over all we had a super fun day and made some good and happy memories along the way.

I LOVE day trips! So fun! So adventurous!

What did you do over the weekend?


PS.  I got the DIY driftwood mirror for the porch done too.  I will be back tomorrow to give you a good look at it so be sure to come back.  I think you're gonna like it!

Friday, June 26, 2015

TAKING ADVANTAGE OF THE FLOODING...

Do you remember me mentioning last week that we had been having a lot of rain?  Well, because of all that rain, the waters of Yadkin Creek in Steelville, Missouri rose higher than they have in many years in the wee hours of the morning last Thursday. The waters ravaged through many of the streets in town leaving debris and destruction behind and one small mobile home park had to be evacuated...


The waters were up high enough to leave mud and debris on the porch of the dark brown building past the bridge railing, where the arrow is pointing.


and guess what?... I am taking full advantage of the situation!

Do you think I have gone MAD making that statement?

Now I know you are probably saying, "there are NO advantages to flooding". "People lose their lives or their belongings and there is much damage during flooding!"  Or, perhaps you assume that I am taking advantage of other peoples' loss, to which I assure you that I am NOT. I would NEVER do such a thing but in the case of the flooding late last week in Steelville I AM taking full advantage...advantage of the one resource that the flood waters left behind...


DRIFTWOOD...and a lot of it too!

You know I need to finish this DIY driftwood mirror I am making for the porch, right?


I thought I was going to have to wait until vacation to find more driftwood to finish it up but the unexpected flooding left me with all the driftwood I could use.

Now mind you, not all the wood left behind is true driftwood but there was plenty of the good stuff to finish my mirror.


So yesterday with Wal-mart bag (or should I say Save-a-lot bag) in hand, I started looting and scavenging the piles of brush to gather up what I needed to finish my project.

Do you think the townspeople thought I was a lunatic?  YOU KNOW IT!  But do I care?...NO, ABSOLUTELY NOT!  I have a project to finish and there is nothing too embarrassing that is going to stop me from doing just that!


So while I felt like a complete and utter idiot, I persevered and gathered a whole bag full, probably even a little more than I needed....that's okay though, if you know me, you know it won't go to waste!


Anyway, I worked on the mirror a little last night filling in some of the gaps with the new driftwood.


She should be ready for her debut next week.

Oh and just in case you think I am a looting or scavenging snob and ONLY take advantage of free driftwood; well, you couldn't be farther from the truth...I will take advantage of every free resource nature has to offer, including flowers from my favorite local roadside stands...


Queen Anne's Lace, also known as wild carrot (which is edible) be careful though that you don't get it mixed up with Poison Hemlock which will KILL you.  They look very similar.  However, Queen Anne's Lace has a hairy stem and a tiny black flower in the center but Hemlock does not.


Wild Daylily, also edible.  I have heard that it tastes like asparagus.
Never tried it myself because I'm too chicken to be a forager.


See I'm not a snob at all!!  I'll take driftwood and a whole bouquet of flowers...


They were just fine in a McDonalds cup full of water until I got home and could put them in a nice vase...


So, are we still friends or are you appalled that I would lower myself to scavenge for driftwood?...and steal flowers off the side of the road?

Please say we're still friends.

Better yet, please tell me that you have done some wild and crazy things too to get something you wanted.

Ever been dumpster diving?  Maybe we'll go together.  HAHAHA!!

Have a great weekend, friend. I'll be back next week with the reveal of my GORGEOUS driftwood mirror.  Hope to see you then!


Wednesday, June 17, 2015

LIFE IS GOOD DIY THROW PILLOW...

It's been raining here, raining A LOT! And, since it's been raining and I can't do anything outside, I decided to keep myself entertained indoors

I took some leftover fabric from the dining room chair makeover, which you can read all about HERE, and a sharpie (you'll see where that comes into play in just a minute) and made a cute little throw pillow...


Of course, it had to have a few encouraging, positive words on it (that's why I needed the sharpie) because, well, you know...so much rain just kind of gets a person down.


So some encouraging words for you today...just in case it's raining where you are too...no matter how much rain falls into a persons life, either literally or figuratively...LIFE IS GOOD!!


Turned out really CUTE don't ya think? Yep, and it totally lifted my spirits too, because...I found the perfect place for this little pillow..

I bet you'll never guess where...


Huh, you guessed it...THE PORCH!

I have a few more projects to finish up out there and then I'll be back with lots of pictures and the BIG reveal...(though I think I showed you a little too much HERE the other day)!! Of course you know that will only happen if it EVER.STOPS.RAINING!!!

I do want to point out, in case you want to make one of these for yourself; and, because I had a question about my transfer method, that I tried to use carbon paper to transfer the words to the fabric but it didn't work.  Not sure why, carbon paper ALWAYS works! This time though it didn't and I was determined to make this pillow so I resorted to cutting the letters out of my paper, VERY PRECISELY, which was easy but VERY TEDIOUS, and use the paper as a "stencil" (no pictures of that process, sorry). Once I had everything cut out, I positioned the "stencil" on my fabric where I wanted it and used a sharpie to fill in because I don't think paint would have worked on this...paper is WAY too thin! It would have been a disastrous MESS! Using a paint pen would have been perfect but I didn't have a black one, so sharpie was my tool of choice here and I think it did a fine job!  Also, I "stenciled" everything onto the fabric before I put the pillow form in so that I had a flat surface to work on.

There are other transfer methods out there (like the wax paper method) that would have been WAY quicker and easier but I just did what I could with what I had available to me at the time.

Anyway, has it been raining where you are?


Sharing at:

Karens Up On The Hill
A Stroll Thru Life
Coastal Charm
Savvy Southern Style
Between Naps on the Porch
Stonegable
My Uncommon Slice of Suburbia
No Minimalist Here
From My Front Porch to Yours
Imparting Grace
Home Remedies


CHECK IT OUT...


THIS POST WAS FEATURED!  YAYYYY!

Monday, June 15, 2015

DROP CLOTH SLIPCOVERS FOR THE PORCH FURNITURE....

Happy start of a new week everyone!  How was your weekend?  I hope it was a good one.  Mine was a little good and a little not so good.

The weekend started out fine. The hubs was out of town for his annual birthday fishing trip and the kiddos and I were chilling at home which meant I had some free time to work on a few projects I had been planning for the screened porch.  YAY!!


I did manage to get most of what I wanted done but then came down sick. BOO!!!  Part way through the day Saturday I began to have a horrible headache, backache and stomachache. Well, pretty much a whole body ache. It wasn't the flu or a cold I just do this every now and again. Not sure why. Could be the rainy weather or my age...or both!! I don't know I just go through spells where I hurt...ALL OVER...and there's really no relief even with pain medicine.

I finished up what I was working on Saturday but then was out of commission for the rest of the weekend. I'm still not quite feeling 100% this morning but am doing a little better. Well, at least the headache is gone!...but enough about me and my aches and pains.  Let's talk about what it is that I was working on BEFORE I got sick...

A cute little summertime vignette on the lucite tray I found at the thrift store last week...


I still have a little zooshing to do but I think it's looking pretty cute, don't you? Besides the cost of the tray...which was $1.50...this was a totally FREE project.  Love those! I had everything I needed already at home with the exception of the sand...I stole that from the beach at the lake when I took the kids swimming. Great reason to take the kids swimming, right?

I also finished up the DROP CLOTH SLIPCOVERS FOR THE PORCH FURNITURE...

But first, a reminder of pretty much what I started with on Friday...


and now...


WOW, don't ya just love how coastal, beachy and SUMMERY this little porch is starting to feel? I do!

Now if only I was looking out over the ocean instead of at a little red mustang....haha.

One 9x12 canvas drop cloth from Lowes was enough to cover all seven cushions so this was a really inexpensive project costing around $25.00 for everything. That's cheap when you consider that replacement cushions for this type of patio furniture is anywhere from $50-$100 a piece.


I recovered the throw pillows with some fabric that I found at a local thrift store a long time ago and had stashed away. Another no cost makeover...LOVE those!!


Okay yes, I wish I would have taken bubs' toy off the table...but I'm just keeping it real here people, keeping it real, and well, that's just kind of how my weekend went...a little good and a little bad but what's really good is how this porch is looking.

I have a few small projects left to do and then this porch will be finished...for summer that is.  Who knows what Fall will bring...but that's the nice thing about slipcovers...when I'm ready to go back to red cushions, I can just take them off and store them away until next summer...or not.  It's up to me and I totally like that have a choice now.

Have you ever considered using canvas drop cloth to slipcover your patio furniture?


Sharing at:

Karens Up On The Hill
A Stroll Thru Life
Coastal Charm
Savvy Southern Style
Between Naps on the Porch
Stonegable
My Uncommon Slice of Suburbia
No Minimalist Here
From My Front Porch to Yours
Imparting Grace
Home Remedies


CHECK IT OUT...


Home Remedies

THIS POST WAS FEATURED AT THESE TWO FABULOUS BLOGS! YAYYYY!

Blogging tips