Wednesday, August 28, 2013

OUR NEW ROOF AND MY NEXT PROJECT...

Good morning, good morning.  How are all of you, my friends, this fine Wednesday morning?  Hopefully you are all fairing well and that you have not caught the horrible stomach virus that has been plaguing the nation lately.  I have had my share of it and I am so glad it's finally over.  The hubs has had it and my daughter was home sick with it yesterday.  We are seriously praying our little bubs doesn't catch it.  So far so good, but maybe I should knock on some wood while I'm at it, huh?

Okay so now the moment you all have been waiting for...a looksy at our new roof.  Yes, I know these are the types of things you all live for.  So without further ado...drum roll please...


Pay no mind to the latter my husband left out the other day, or the huge overgrown bushy weed at the corner of the flower bed, I'm just keeping it real here.  Hahaha.  Pay attention however to that beautiful new roof.  Gorgeous isn't it? Goes great with the house, doesn't it?

It has architectural style shingles in rustic black and a new vented ridge cap.  There were some problems in the flashing area.  Some of the flashing is showing  (which irritates the fire out of me)...see the silver part showing where the roof of the front porch meets the house? That's the flashing.  They did things differently way back when this house was built.  They didn't use flashing then.  Most times to make the roof air tight they just stuck shingles up under the siding or used tar to seal the seams.  This was the case with our house. Nowadays they use metal flashing which is thinner and it left a gap between the new shingles and the siding. Now our flashing is showing.  Haha, that almost sounds as if our roofs underwear is showing.  Hehehe.  This problem is no biggie really, we just have to climb up there and paint it the same color as the siding.   Or should I say the hubs has to climb up there and paint it!

Oh, did you notice that the finial over the door is finally back in place.  Ahh, I love it.  When the house was all white you couldn't even see all the beautiful architectural details and trim this house has.  I'm so glad I decided to give the house a new color last year.  Now all those details really stand out, including our exposed flashing in this next pic!!!


We will be putting the shutters up and the storm door on later this week.  As soon as that's done I will give you all the details.

And now a little pic of my next project which I hope to start on Monday...


I am soooo EXCITED about this project.  The finishing of it will put me one step closer to finishing my dining room redo.  I hope to transform this pedestal table, a Rolla Net (sort of like Craigslist) find, into something that looks more like this...


I will be making up some homemade chalk paint for the bottom and using a vinegar and steel wool solution to weather the top.Wish me luck!


Monday, August 26, 2013

TEACHER'S PET...AND A LAUGH

Well as we all know it's back to school time.

My children started back to school nearly two weeks ago.  A little early I think but I guess that means they will get out a little earlier next year.

I always like to give my children's teachers a little homemade gift at some point during the year just to say thanks for doing what they do.  I usually do this at Christmas time but I saw something at Michaels recently that made me want to rethink this and perhaps give the teacher a little something at the beginning of the school year...


How about a little back to school wreath for the classroom door.  Isn't this soooo adorable?  It is so doable too.  You would never have to pay $49.99 for this unless you wanted to.  You could totally do this yourself for MUCH cheaper.  I have seen the pencil cutouts, sunflowers, scissors and faux apples at the Dollar Tree store.  They also carry styrofoam wreaths for $1 there.  The only costly item on this wreath is the burlap ribbon and even that isn't $49.99 so you could afford to make more than one.  I'd hate to make my son the envy of the class and the teacher's pet but I so want to make one of these for the Bub's teacher this year.  It's just too cute!!!

Now for a little laugh...

I was in downtown Washington, Missouri recently and came across a cute little store...It was their sign that caught my attention...


I just could not resist snapping a pic so you all could get a little chuckle too.  So Cute!!!


Sharing at:

Between Naps on the Porch...Met Monday
Coastal Charm...Nifty Thrifty Tuesday

EASY & INEXPENSIVE DINING CHAIR FACE LIFT...

Hello, hello!!  Hope you all had a good weekend.  I thought I was going to but I ended up with a horrible stomach virus that left me bedridden for much of the weekend.

Now I know that I said I would be back bright and early Monday morning with photos of our newly finished roof, but you will just have to wait until tomorrow because at this point I am picture less when it comes to the roof. By Thursday afternoon when the roof was finally finished I was too sick to even venture outdoors with the camera.  I did however manage to get a little project done indoors beforehand...

I gave my dining room chairs an inexpensive face lift!

Now the last time you saw my dining room I had a vintage Duncan Phyfe style table and chairs but they were just too big for the room so I sold them.  I think I forgot to mention that little fact.  Anyway, this is what has been in their place...


An old thrift store round table and some old parson chairs.  Yuuuck, can everyone say "the 80's wants their chairs back"...FOR REALS, right!!!!  By the way, do you like my new rug?  It was an Overstock.com special and it was just what I was wanting for my dining room redo....The table and chairs however are not what I am wanting for this room.  I do have a vision for this room and this table and chairs aren't in it!!! That said, they have to suffice until I find and afford what I want, so the chairs got a little makeover.

I started by removing the fabric from the legs to expose the raw wood...


Whew, that was a lot of work as there were a lot of staples! The wood on these legs is not great but good enough.  Once I got all the legs stripped and sanded I painted them brown...


Oooops, I forgot a side...hehe.  See the wood is pretty poor but the brown paint hides most of the imperfections.  After the paint was dry I added some inexpensive Sure Fit slipcovers that I had ordered from Wal-mart.com for $12.00 each...


I got them in the soft suede fabric not duck cloth like in the photo above.  They aren't a perfect fit but they are pretty darn close and made such a huge difference....

Let's see the chairs one more time before...


and AFTER...


Ahhhh yes, that IS much better.  They will certainly do until I can afford something better.  What do you think? Do you like these old 80's parson chairs now?  

This little face lift was super easy and the total cost...$50.00.  A couple dollars for paint and $48.00 for the slipcovers.  These slipcovers are easy to take on and off and they are washable.  Did you know that Wal-mart sells slipcovers?  They do and they are about half the price for the same Sure Fit brand as everywhere else I have found them.  So next time you are in the market for a slipcover you might try Wal-Mart first. They might just have what you need for cheaper.

I'll be back tomorrow with roof pictures, I promise!  I know you can't wait, lol....


Sharing at:

Between Naps on the Porch..Met Monday
Coastal Charm...Nifty Thrifty Tuesday

Wednesday, August 21, 2013

IT'S WHAT'S UP...FINALLY...

So, WAAAAAAAY back in June we hired a contractor, Mike Jackson of MJ Roofing, (the best in our area) to put a new roof on the house.  He's a very busy guy and told us that it would probably be the first to middle part of July before he and his crew could get to our house.  Around the middle of July he called and said it would be another few weeks because of the rain we've had this year.  His crew was behind but he thought they would get to our house around the first week of August.  NOT!!!

Well it was nearing the third week of August and there was no new roof and no news either for that matter.  So the hubs called Mike on Monday.  He said, "Oh, I was just getting ready to call you to let you know that we will be out at your place at 6 o'clock Wednesday morning to start on that new roof for you."   I thought to myself, "Oh sure, he's probably just saying that to appease us for now but come Wednesday morning he will call with an excuse as to why he can't make it."

Boy was I wrong!  They showed up PROMPTLY at 6 a.m. this morning and got to work....and man let me just say these guys work FAST.  Before I left for work at 7:20 this morning they were almost done ripping the old stuff off....


Sorry for the blurry, shadowy, sun dappled shot.  This was a drive by from the car window as I was leaving the driveway for work.  Not to mention our house faces West so it doesn't catch the morning sun.  That doesn't make for good pictures but it is good for the guys on this side of the roof.  It's the guys on the back of the house that had sun in their face this morning, LOL.

Oh, by the way, you are seeing for the first time how the house looks after the fresh coat of paint we gave it last fall.  The body is Gray Silt and the trim is Chef White, both are Duramax by Valspar.  I have been waiting to show it to you all because I was wanting to put the finial back up over the door, get the new storm door on and put the new shutters on before I posted a reveal. Those things will be happening soon, so I hope to show a full reveal sometime this fall.

The roofers should be completely finished tomorrow afternoon and I am hoping to get the shutters and door installed this weekend.  Keeping my fingers crossed!   The shingles I chose for the roof are "Rustic Black".  I chose black because it's a classic that will go well with the Gray Silt and Chef White but it will also go good with any other color should we decide to repaint the house in the future.

I will be back first thing next week to let you know how the new roof looks.  I  hope I can show you more, but we will see.  Until then have a fabulous rest of the week and a wonderful weekend.  Ciao!


Monday, August 19, 2013

HOMEMADE BEEF FRIED RICE AND CRAB RANGOON...

"SQUEEEEAL"...I am so excited!!!!!!!!  This is a landmark post here at Beyond the Portico because today I am going to share a scumpdealeicious recipe with y'all.  My first ever posted recipe.  Yay!!!  I have wanted to do some recipes on here for a long time but it seems that I never really get the time to cook or snap nice shots of the food.

Mainly this is because my husband does most the cooking at our house. He gets off work before I do and he almost always has dinner sitting on the table when I get home....I know I am soooo spoiled!!!!.   There are cons to this arrangement however....he usually leaves a huge mess for me to clean up and he has ruined every nice set of cookware I have ever owned...but I guess that is a small price to pay to have dinner ready and waiting for me every evening...LOL!!!

The other reason I can't get good shots of the food is because the people at my house are ready to eat as soon as the food is put on the table.  There's no time for snapping photos before the food gets cold or before somebody starts digging in and messing things up!

This weekend was different though.  I actually did the cooking!!!  I made homemade BEEF FRIED RICE along with a side of homemade CRAB RANGOON.   It was super delicious and super EASY!!...and guess what, I managed to get a nice photo of it for your viewing pleasure.


THIS IS NOT TAKE OUT!!  I repeat, THERE IS NO TAKE OUT HERE!!  I really did make this from scratch, all by myself, right here at home.  Really!!!  Though I won't lie and say that this shot was taken before we ate and before the food got cold....huh, huh, (clearing throat) no, I can't say that!  This is how it all went down....

I cooked, then patiently waited until after we all had eaten before plating up a special plate just to get a picture for this post.  I know, I know the horror of it all.  You're looking at cold, greasy, soggy food here folks. Sorry 'bout that, but you gotta admit it does look good, doesn't it?  Mmmm, believe me it was better than good.  So good in fact that there was almost not enough leftovers to even get this shot.  I literally took the crab rangoon off my daughters plate before she was done eating so I could snap a pretty picture of this meal and that's the horrible truth.  Ohhh the things we do for blogging...

Now if you want to find out just how good this homemade Asian meal tastes when it's hot, you are going to have to make it for yourself.  Here's how:

BEEF FRIED RICE
    • 2 tablespoons vegetable oil
    • 2 eggs, lightly beaten
    • 2 tablespoons plus 1/4 teaspoon soy sauce
    • 1 garlic clove, minced
    • 1 tablespoon minced peeled fresh ginger
    • 1 bunch scallions, white and green parts separated and thinly sliced
    • 1/2 pound eye of round steak
    • 1 small bag frozen peas & carrots
    • 2 cups cooked white rice 
    • 1 tablespoons cider vinegar

DIRECTIONS:

  1. In a wok or large nonstick skillet, heat 1 tablespoon oil over high heat. Meanwhile, in a small bowl, lightly beat eggs with 1/4 teaspoon soy sauce to combine. Add eggs to wok and swirl to coat bottom of pan. Cook, without stirring, until almost set, 1 minute, then fold in thirds with a spatula. Transfer cooked eggs to a work surface and cut into 1/2-inch pieces.
    Add 1 tablespoon oil to wok and swirl to coat. Add garlic, ginger, and scallion whites and cook, stirring constantly, until fragrant, 30 seconds. Add pork and cook, breaking up meat with a wooden spoon, until just cooked through, about 3 minutes. Add carrots, peas, and rice and stir to combine. Add cooked egg, 2 tablespoons soy sauce, and vinegar and cook, stirring constantly, until rice is coated, about 1 minute. Let cook, undisturbed, until warm, about 1 minute. Top with scallion greens and serve.
CRAB RANGOON
  • 1 8 oz. block cream cheese, softened
  • 1 6 oz. can white crab meat
  • 2  tsp. garlic powder
  • 1/2 tsp. soy sauce
  • 1  tsp. Worcestershire sauce
  • 1 pkg. wonton wraps


    1 scallion, minced
    Oil for frying
DIRECTIONS:

In small bowl cream together cream cheese and crab meat.  Stir in garlic powder, soy sauce, Worcestershire sauce and minced scallion.  Drop mixture by small spoonfuls onto center of each wonton wrap.  Fold corners of wrap up and seal. Deep fry in a sauce pan of hot oil. 

(Note:  When preparing my meal, I prepped all the crab rangoon first but waited to deep fry them until after the Beef Fried Rice was done.  I placed the Beef Fried Rice in the oven to stay warm and then fried the Crab Rangoon.  This way the crab rangoon is not cold, greasy and soggy before the entire meal is ready.)


So there you go, my first ever recipe post.  I hope you will try this super easy, super yummy recipe soon. My family loved it and I'm sure yours will too.  Be sure to come back and let me know how yours turned out. Maybe you can even snap a picture of it....well that is, of course, after everyone has eaten. LOL!

HAPPY EATING and "Zai jian" (that's goodbye in Chinese).


Sharing at:
Coastal Charm...Nifty Thrifty Tuesday
My Uncommon Slice of Suburbia...Tuesdays Treasures

Friday, August 9, 2013

A LITTLE SURPRISE...

We had a little surprise sitting on our doorstep when we got home from church late Wednesday evening...


A sweet little female kitten...very tiny and very young at about 4 weeks old.  Not even ready to be weened yet.  We are not sure how she made it up the steps to the door or who might have dropped her off there, but it is for certain we weren't looking for a new addition to the family in the way of a furry little kitten. However, we just couldn't say no especially since she was sick and needed immediate medical attention.  Besides, she is just sooooo sweet and has such a gentle spirit.

This precious little baby had a prolapsed rectum....(viewer discretion advised as the following picture is very gross and ugly)...


When we first found her we thought she might have to be put down.  We didn't know what exactly was wrong with her at the time and we certainly didn't know if she could be fixed but we got her into the vet right away and had her fixed right up.  The vet said this was a pretty common problem with small kittens who are born in the wild or to an "infested" mother.  This little girl was infested with fleas as well and already had a few maggots.  That problem was taken care of too and she is on antibiotics.

Yesterday was a pretty tough day for her but she is doing fine now.  She is starting to eat again thank goodness.  We were a little worried there for a while.  We have her on kitten formula feeding her with an eyedropper every two hours.  She must have been feeling a lot better this morning because she curled up on my chest after feeding and started purring.  She has truly stolen our hearts.

I will share her progress and more pics in a few days.  Please say a little prayer for her if you would as she is not completely out of the woods yet.  She is still a pretty sick little girl.

We haven't officially given her a name, but the kids think "Miracle" would be a good one.

Thank you and have a great weekend.


Thursday, August 8, 2013

WORKATION...PART III...HOOPER HOUSE

Now for the conclusion of our workation escapades...

When I left you last time we were walking down Hooper Trail at the Harry S. Truman Visitor Center in Warsaw, Missouri.  It is a real must see place if you are ever in or near Warsaw, MO.  My family loves it in Warsaw and I can't speak for the rest of the family but the visitor center is MY favorite place to visit.  If you are a house lover and I know you are, you will see why this is my favorite place.  It captures the essence of the American dream right down to the little picket fence...

Just past the little one room schoolhouse is Hooper House.  The cutest little one and a half story saddle bag style home. Here's a little history behind it and a description of "saddle bag" style and why it is unique...


It features a small kitchen,


bedroom...


 I love this beautiful old secretary and bookcase...


I love the lacy window panels.  I can just imagine that is exactly how it looked when Mrs. Hooper decorated her charming little cottage.


This next little seating area was in the back of the house behind the kitchen and bedroom.  This was the largest room in the house and was set up as if it was the living room.  We couldn't go upstairs, but I would imagine that it was the original master bedroom when the Hooper's lived in it.  In those days, I would think the living room and kitchen areas were in the front of the house and that the large room in the back was used as the children's bedroom (most families had many children and the room was long and narrow.  Perfect for setting up a "row" of beds) and then the parents bedroom was upstairs.  For now they have a small table and chairs, dresser and closet in that room...


There was also a summer kitchen.  Have you ever heard of one of those?  It is a special "detached" kitchen that was used in the summer time to prep and cook meals without heating up the main house.  What a great idea.  I would love to have a summer kitchen, wouldn't you?


looking out the backroom door you can see into the summer kitchen door and Visa Versa.  This way mother could keep an eye on her napping children.


Inside the kitchen what else would there be but a nice large stove.


This small kitchen had just enough room to prep and cook meals.   I love it so much.

I totally love this whole little town and this little saddle bag house is just to die for.  Such simpler times for sure.   There's no doubt this is my favorite place to come when I visit Warsaw, Missouri.  If I could, I would pull up a rocking chair and sit for hours just soaking in all the nostalgia of days gone by.

I would totally go back this weekend if I could.  Maybe I will get to go in late October when they host the Heritage Days festival.  There will be all kinds of artisans and vendors making and selling their wares along with some amazing Ozark mountain food.  Yes, yes, that sounds like a plan and if you are in town about that time you might want to get in on the festivities.  Hope to see you there!!


WORKATION...PART II

We had such a great time at Truman Dam and Lake and I took a lot of pics of our adventure at the Harry S. Truman visitor center.  Too many to put in one post for sure.  As I said in Part I there are a lot of things to do at the visitor center.  Not only is there a conservatory to view the dam and lake but there are some outdoor attractions as well.  So here is part II of our day at the visitor center.

The visitor center is home to the Elmore Log Cabin Complex, Kaysinger's General Store and Hooper House.  They places are strewn along a 1/4 mile long walk.  A very pleasant little hike.  First stop Elmore Cabin and a few outbuildings nestled just inside a stand of tall cedars...


I love the "fenced" yard, don't you?


Sorry for the blurry pics.  Point and shoots don't always give the best quality.  This is my son, AJ, in red along with my Brother-in-law and his two grandchildren.  They were having a great time.

Upon entering the Cabin is the Cabin's sign.  You might notice it shows the Cabin was established in "1999". That is not however when the cabin was built.  The cabin is from the 1800's and was moved here to preserve it.


Inside the cabin was one room and it also had a loft bedroom, which I did not take a picture of.  The downstairs room had a dining nook tucked under the stairs...


A kitchen area...My aren't you glad our kitchens are a tad bigger these days?...


and a fireplace in the living room area.  I would imagine the fireplace was also used as a stove.  


Just after visiting this cute little cabin, and at the top of the trail is Kaysinger General Store.  This is the
newest addition to the center.  When we were here two years ago they were just finishing up building this cute little store and it was not open yet.  I am glad we got a chance this year to see it in operation.


There were lots of handmade quilts.


I loved the handmade board games.  So neat!!


I loved the handmade brooms too.  I especially liked the ones on handles.  They remind me of witches brooms.


The little store is designed to look as if it were straight out of the prairie days.  The immediate picture that came to mind upon stepping into this cute little store was the Olson's General Store from Little House on the Prairie. So cute and full of homemade wares.  Quilts, brooms, baskets, jams, jellies and much more. Even the folks running the store were in full prairie attire.  However I didn't get a picture of them as my battery went dead before I got the chance to snap a shot of them.  DRATS!!!  I knew I should've charged my battery before leaving home.

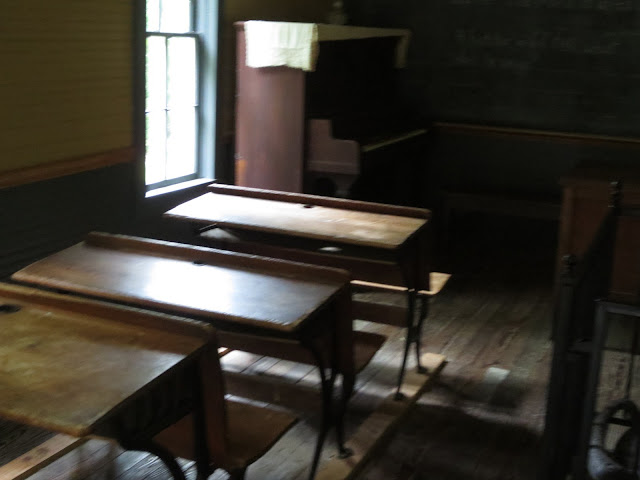
Never fear though I did get shots of the other attractions on sight because we waited until last to visit the store.  Once past Kaysinger's General Store there is an old stable and then the Concord Schoolhouse...It's a one room school house that at one time was used as a school, church and I believe a post office.


Well, when they said it was one room, they weren't kidding.  It's one small room and functioned as everything a town needed...school church, city hall...you name it.


 I bet there was a lot of reading, writing and arithmetic done on these desks way back in the day, all done on slate boards.  I didn't take a pic but they had a stack of those on a small bookshelf in the corner.


Hooper trail is set up to look like a little old time prairie village.  There are a few barns and stables, the one room school house, Hooper House and a few outhouses.  There are plenty of of things to see.  Like this little well, (with a modern day fixture)...


A threshing floor and outdoor furnace,


Cool huh?  I think my favorite little outbuilding was this cute little outhouse...


so, so glad we don't have use those anymore!!!  LOL

Well, I am going to stop here and leave you on the pot because this post is getting way too long and picture laden but I will be back later to share with you the conclusion of my workation and walk down Hooper Trail. Until then take a load off and have a great day!


Blogging tips