Thursday, January 5, 2017

CHRISTMAS AND EVERYTHING ELSE...

I know I haven't posted for a LONG, LONG while.  I finally and hesitantly entered the world of Facebook and it has just been a whole lot easier to post little nuggets there than do a whole big blog post here.  However, I had taken a long hiatus from FB for the holidays and have decided that I like the virtual peace and quiet so much that I may get off the FB train for good....or at least for a while.

I have found that I really don't like knowing everyone's day to day business or their opinions about every.single.thing.in.the.whole.wide.world.  Is that bad?  I especially don't like those posts that asks everyone to like, share or comment on every.single.thing they like or dislike.  I am one who generally keeps my opinions to myself and I like it that way.  So, other than the keeping in contact with close family members to see what's up in their world, I will probably not be seen on FB much at all.  Whew!!  Now that I have gotten that off my chest, lets get on with more important stuff....like what's going on at Beyond the Portico.

We decorated...we had Christmas...we undecorated....YAY!!!!  HAPPY NEW YEAR!!  Hahaha...

No really, I do have a few Christmas pics to share with you today.  As usual I loved Christmas...BUT so very GLAD IT'S OVER and that all the decorations are put away!!!  The house is pretty much back to normal and it feels good.  Glad to have made it through another year...WHOOOO HOOO!!!.

I will also share here some of our future plans on the house since it didn't sell this past year.  Yes I was terribly disappointed it didn't sell and that I didn't get my house in the country, but I am completely okay with staying put....so long as we make a few updates.

So now without further ado here's a little look at Christmas 2016 for us...

A peak at the dining room first...


I decided to put Bambi on the table and I used some left over greens from the real Douglas Fir tree we put up in the living room to make a nice large centerpiece.

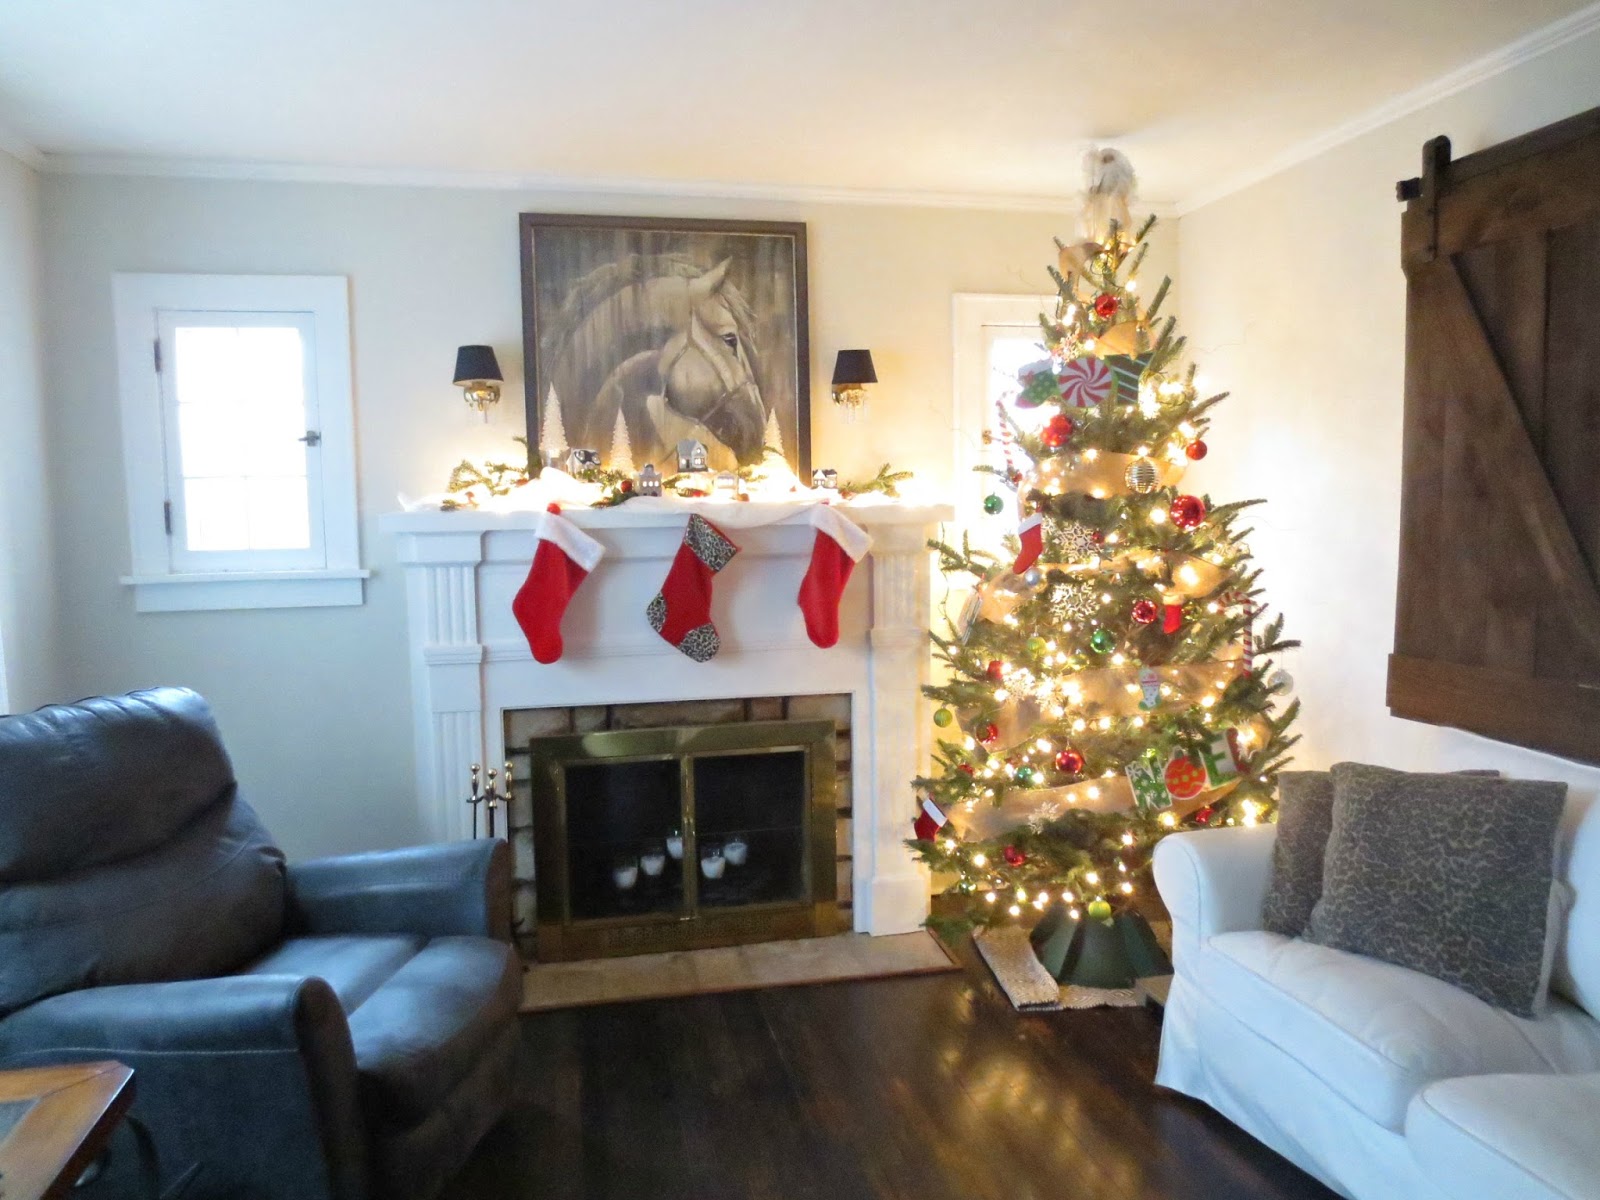
This years tree...7 ft. Douglas fir


So glad we went with the Douglas Fir instead of the Scotch pine this year.  The needles were SOOO much softer to the touch and it was totally gorgeous.


I am totally ashamed that I never got around to putting a tree skirt around her.  UGH!  The mantel turned out lovely though...


You may notice a "special" stocking there.  It was for the kitties...I figured they "needed" a few toys for Christmas since they had to be banished to the basement for most of the holidays to prevent them from climbing...and knocking over...the tree.  LOL.


Notice the new sliding barn door in that pic?  Yes? The hubs and I built a pair of sliding barn doors to hang on the wall over the sofa a few months back.  I hesitate to tell you why, but what the hay...

The hubs decided (demanded) to bring the TV we use for games up out of the basement. I have been FIGHTING him tooth and nail on this; because, for one TV's are completely UGLY and for two, there was really no suitable place to put a TV in our tiny living room.

For 6 years he has thought of EVERY possible place for the thing, including putting it inside the fire box...which he tried at one time....it did make a good YouTube crackling fire for those cold winter nights....Hehehe...remember this? (Christmas 2014)...


Oh yes, the fire looked good but otherwise this was SOOOO RIDICULOUS!!!

When the firebox wasn't working out he wanted me to get rid of my horse painting (which is normally there)...and the sconces...so he could put it on top the mantel...by which I REFUSED!!!!  I mean really, the sconces are hard wired and leaving two big holes in the wall was not an option...PERIOD...and especially not for a big ol' TV!!


Anyway, he was getting super angry and frustrated after 6 long years of not being able to comfortably relax in our living room...and then when the house didn't sell...and the opportunity for a more accommodating living room fell through...I had to compromise with him...after all this is his house too...and retiring every evening to the dank, dark, unfinished basement to play games is a big bummer for everyone.  So...I gave in and said he could hang it on the wall behind the sofa where the big mirror was.


It was the only possible place it would work out...my only demand was that we had to do something to make it look "good", disguise it or hide it...or all of the above...so the gorgeous barn doors...which go so well with my horse picture...were built and installed.


They're not perfect but then again does a barn door have to be perfect? No! We did an awesome job on these though and in my opinion they look GREAT. I will share full pics of them soon!!!

Now for future house plans (that will hopefully be accomplished this year)...we are going to knock down the wall between the kitchen and dining room (which is load bearing by the way....can anyone say SCARY)!!


Then we are going to gut the entire kitchen and remodel.  I have figured out a plan that will give us more counter space and a proper work triangle...something this house DESPERATELY needs.  I see quartz counter tops, cute tile backsplash and stainless steel appliances in 2017.  Wish us luck! WE ARE GOING TO NEED IT as we are DIYing ALL of it.  However we will probably not begin this project until warm weather because we will be eating a lot of meals outside off the grill. Hehe.

We are also going to try doing as much of this project as we can without taking out a big loan...not sure how that's going to work but we are going to take every penny that ain't nailed down for other things to accomplish this.

Anyway, I will be back later this month with views of the barn doors and the new kitchen layout for you to oogle over.

Ciao for now!


Tuesday, September 20, 2016

WE TRADED SPACES AGAIN....

A few years ago the hubs and I traded spaces with the Sis.  We gave her the master bedroom and we took the bedroom upstairs.  Well, all that has changed again.  She is now back upstairs and we are on the main floor.

We gave sis our old bedroom furniture because we didn't want to have to haul it downstairs...that sleigh bed is a real beast...not even kidding.  She really didn't want our old stuff but it is best for the time being...especially since she is not willing to fork out her own hard earned money for what she wants...hahaha.

Anyway, sis has wanted a nautical themed room for a while...actually she changes her mind about as much as I do...so about the time I get done with her room she'll be wanting something else....LOL....so I decided to try and use what I could find at home to add a little nautical flair to her "new" room without spending a bunch of money.  I didn't have much and what I did have is more beachy/coastal than nautical but it's better than nothing and I like how it's turning out.

We still have lots of accessorizing to do.  I need some shells and driftwood to accessorize the bedside tables and I would like to either sand the furniture down to bare wood for a light driftwood beachy vibe or paint it white, but that's probably not going to happen for a while. That's more hard work than I want to engage in right now.

Also I will be making a pallet art sign for over the headboard that she wants...which will say "JESUS ANCHOR OF MY SOUL"....but now without further ado let me show you a few pics...


We used the white ruffle bedding and aqua sheets she already had.  I added a couple Pottery Barn pillows that I found at the thrift store for $1 each.

Of course you know from my last post that I made the faux capiz shell chandy.  I think that's my favorite thing so far.


While I was at it, I gave the landing a little makeover.  It's not coastal but it is in keeping with the coastal color palette I have been using upstairs...aquas, whites and grays.


Now I need to do a little work to the master bedroom. Ugh...just thinking about it makes me tired.  HEHE.  Anyway, when I get some of those things done I will share.


Wednesday, September 14, 2016

FAUX CAPIZ SHELL CHANDELIER DIY...SUPER CHEAP AND EASY...

Sorry it has been such a long time since posting.  Just as I was getting ready to share this DIY faux capiz shell chandy, I realized my camera card reader was missing.  I had to order a new one.

Anyway, here is a somewhat short tutorial in case you want to make one of these GORGEOUS faux capiz shell chandys for yourself...or a friend...or just because they are so stinkin' gorgeous...


So how do you make one of these lovelies you ask?

First, find yourself a couple embroidery hoops in two or three different sizes...depending on how many tiers you want.


I used three different sizes...12", 9" & 5"  and wrapped them in jute twine for a truly coastal look...


or if you are looking for something easier than spending hours wrapping them...get out some spray paint.

I left extra long strings of jute twine coming down off the largest hoop so I could tie my smaller hoops to it to form a base to hang all my "capiz" shells from so I would get my tiered effect.


Once I had the base done it was time to make the shells...using WAX PAPER...A little note...the wax paper from dollar tree WILL NOT work.  It must be Reynolds brand or similar.  The nice thing about wax paper is that it is cheap everywhere.  The Reynolds brand was only $1.34 at Walmart.  You will most likely need 2 boxes.

Stack 3 to 4 sheets of wax paper together and iron on low heat until they fuse together...briefly touch the iron to paper...you do not have to hold it in place.  Move the iron around until everything is fused.


Once you have several sets of stacked, ironed paper it's time to make "shells" from it.  I wanted round shells in 2" and 1" sizes.  I already had circle punches at home to make them.  However, if you do not have any punches available you can simply cut the paper into squares.


I will just say that you are going to need A LOT of circles (squares, etc.)...my project took about 250 more or less to finish.

Once you have all your "shells" sew them together with a straight stitch with your sewing machine. This is easy and doesn't take long at all.


Next I cut my strands into 5 shell lengths and hot glued the 5 shell lengths 1" apart onto my jute twine chandelier base starting at the bottom of the base.


Keep gluing until the whole base is covered with shells.


That's it!!

Using more twine secure your Capiz Shell Chandelier to your ceiling light fixture and you're DONE.


Super easy...though somewhat time consuming...and CHEAP.  This whole project cost me less than $5.

I found my embroidery hoops at a thrift store for .25 each. $1.35 roll for wax paper and $1 for spool of twine.

Now go out and make one of these beauties!!

Ciao,


Blogging tips