Friday, August 22, 2014

A THRIFT STORE TRAY MAKEOVER...

Hello all and happy Friday!  Yes, TGIF!!

I spotted an old UGLY serving tray a few weeks ago at a thrift store for $1.00 and thought it would be perfect to use in the kitchen to corral my flour and sugar canisters.


However, it was in much need of a makeover (and a GOOD CLEANING)! Lucky for me, I had everything in my stash to do a quick, FREE revamp of this little tray.

I had a small sample container of Ben Moore's Revere Pewter and some left over chalkboard paint from my DIY chalkboard project HERE...


So I disassembled it and gave everything a good cleaning...


I then gave the frame a couple coats of Revere and the tray lining a few coats of chalkboard paint. Once everything was dry I inscribed a little message... Bon Appetit...(in white crayon so that it's more permanent) on the chalkboard and put it all back together...


Yes, that IS the same tray only BETTER!

It is now the perfect addition to my kitchen.  I have very limited counter space and this little tray allows me to easily move my canisters out of the way when needed.


Have you been working on any cute little space saving projects lately?

Have a WONDERFUL weekend! Ciao.


Thursday, August 14, 2014

NOT SO BUMMED OR FRUSTRATED TODAY...

Okay, I am sorry for yesterday's rant about hating the new paint color. I know you must think that I am an avid complainer.  I'm not and...I actually DON'T hate it. I won't say I am in love with it but I don't hate it and it is starting to grow on me. Though its much lighter and not as rich as I had envisioned, it's going to be okay and...there are some things I can do to change how it looks on my walls.

First, painting the crown molding and trim a bright/creamy white will help (yes I know, more painting, ugh) and I discovered a little something that has helped already...


I changed the slant of my mini blinds. Yuck, did I just say mini blinds? Yes, I did because I still use them. Now I know most home bloggers out there prefer fancy wooden roman shades and wouldn't even contemplate using cheap vinyl mini blinds anymore but I like them and still use them in most of my rooms. They are cheap inexpensive and I don't have to make sure my wood grains or colors match as with wood blinds. Plain white is always perfect!

Anyway since I changed the slant of my blinds from down (like in the photo above) to up, it changed the way natural light flows into the room projecting the blue light onto the ceiling instead of the floor and walls making things look less blue and washed out. Yay!!  

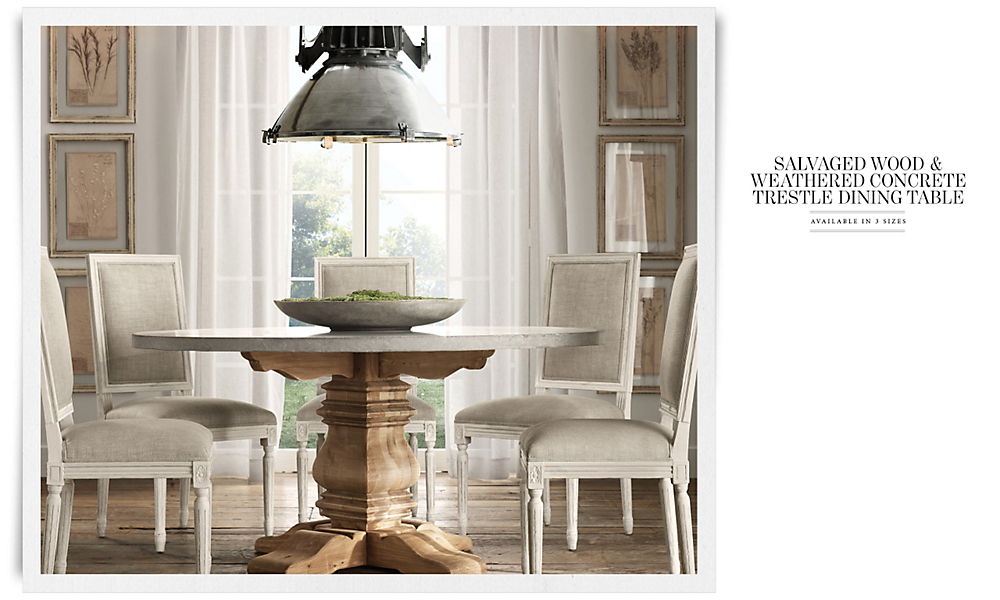
And now that I am having a better day, a better outlook and better perspective about these four walls of mine, I thought I would show a little of what I have in mind for these four walls...Restoration Hardware style...


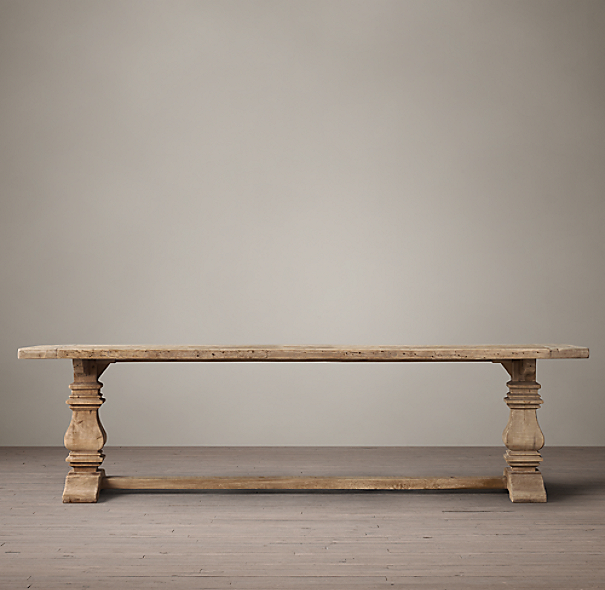
I love the sheer white linen curtains, natural linen chairs and botanical prints in this room but I would definitely change the lighting and the table...I like the table but my family don't want a round table so I would go with something like this gorgeous trestle table instead...


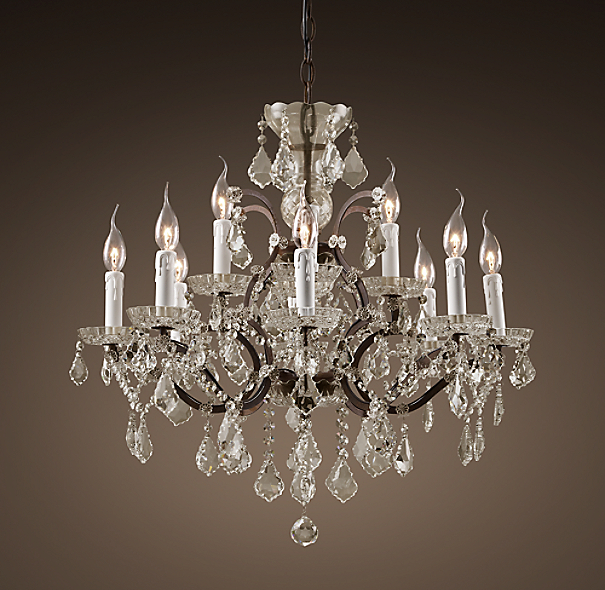
As for the lighting I would have to have a shimmering chandy like this...


19th C. Rococo Iron & Clear Crystal Round Chandelier 26" - Rustic Iron


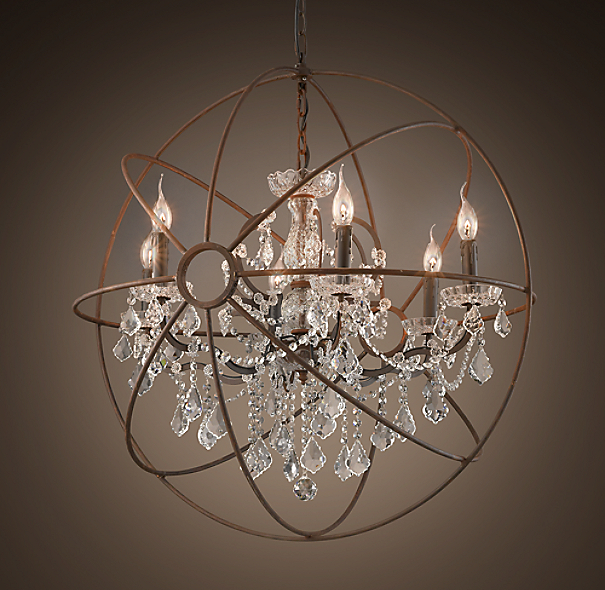
or perhaps something more modern like this...


Foucault's Orb Crystal Chandelier 32" - Rustic Iron


Of course you know I am dreaming, right?  I could never afford anything from Restoration Hardware but I can work with some of the things I have and I can also do some Restoration Hardware copycat projects to get the look I want and that will go with my newly painted walls..

We shall see!  Of course you know I will keep you posted!

Have a fabulous day. Ciao!


Wednesday, August 13, 2014

THE PIG IS GONE...BUT I'M STILL SO FRUSTRATED...

Heck of a title for a blog post don't ya think?  Let me explain...

This is a story of a VERY frustrated little woman...

As you well know I have hated my pig pink walls since the day I originally painted them.  The color was beige buckhorn from Wal-mart and was the suggestion of a friend.  Of course it looked "great" in her house and that's why she suggested it.  Though others liked it in my house, they didn't live with it day and night and to me it at times looked garish, muddy and even dirty. Besides, the pinkish tinge was driving me crazy and NOTHING, absolutely NOTHING went with it.  So finally, after getting permission from the hubs to spend more money on paint, I spent the better part of last Saturday (approx. 12 hours) getting rid of the "pig" from my living room, dining room and two small hallways.  Yes, I painted ALL that (by myself) in just ONE day (and was sick the next day with a massive headache) because I hated those pig pink walls so much.

However, I HATE the new color too.

Waaaa, waaaa, sob, sob, WAAAAAAAA!!!!

You see, I had been dreaming of a nice light gray/greige for a VERY long time and was wanting to try Revere Pewter by Ben Moore. So awhile back (way over a year ago) I got a sample of Ben Moore's Revere Pewter mixed in Valspar from Lowes, painted it on a few poster boards, hung them on the walls and looked at it day and night for what seemed like forever. I thought it was perfect BUT the hubs didn't like it.  He said "it's too green". So I nixed the idea of having Revere Pewter walls, which I had my heart set on.

Then I spotted these gorgeous rooms painted in Ben Moore's Classic Gray OC-23...


Benjamin Moore Classic Gray Design Ideas, Pictures, Remodel and Decor
Houzz.com


Our Vintage House Love

and knew that it would be the perfect color for my house.  It's light, bright and airy with a hint of perfect, right?!! So I skipped the sample altogether (which is a BIG no no) because I just knew this was the one, the right one!

Well get this, the color don't look the same in my house as everyone elses...


It's all washed out at times with tinges of blue in my house! Tell me, WHY?  Is it the West facing light that's making it look that way? Is it because I had it mixed at Lowes in Valspar brand paint instead of paying ridiculously high amounts of money for the Benjamin Moore brand? Or, is it because God blessed me with this TEST of a house and is wanting to see just how FRUSTRATED I will get before I decide to burn the place down?  WHO KNOWS!

Oh how I have prayed, begged and pleaded for God to have mercy and let me get it right so I can move on....

I have NEVER had these problems before. I would paint, it would look GOOD and we would go from there. Oh, but not with this house!  My last house I had painted and decorated perfectly in less than two years and was content to just dwell but not so with this house. NOTHING looks good in this house.  I have painted these two rooms and hallways 3 times now...3 and I am FED UP with painting only to have everything look...well the best word to describe it is...NASTY.  Nonetheless, I am going to have to be happy with this and make due because the hubs has already said that we are not buying anymore paint! Period, end of story!

Not sure why he's so put out...he hasn't lifted a single paint brush to help on the painting any of these 3 times.

So what's a girl to do?  Well, I guess I am just going to have to change everything out with stuff that WILL look good with this color, if that's even possible

So, do you know anyone who wants to buy a new silvery gray sofa and loveseat (seriously I want rid of them), a red rug, two pineapple prints or any of my other stuff?  If so do tell!


Monday, August 11, 2014

A RUSTIC DIY CHALKBOARD FOR THE KITCHEN...

Hello and happy Monday!  How was your weekend?  Long and relaxing I hope.

Sorry I didn't get back with you last week as promised to show you what this picture at the end of my last post was all about...


Did you guess that I was going to make a chalkboard?


I saw Dear Lillie's huge chalkboard in her kitchen and knew that a similar one (only much smaller) would be perfect in mine, huh huh, though her kitchen is WAY more beautiful and bigger than mine.


So I bought a 2' x 4' piece of 1/4" plywood, a 1" x 4" 10 foot long and a quart of chalkboard paint. I had everything cut to size at the store (Lowes).  The 1x4 was cut into 4 pieces...2 20" long pieces and 2 40" long pieces.  I had the plywood cut to a 22" x 35" rectangle.  Hope that made since.


I simply glued and stapled the 1x4 together to make my frame.  I sanded and painted the plywood with chalkboard paint and once it was dry nailed it to the back of the frame.  Super easy!  I didn't even stain the frame.  My 1x4 was naturally pretty dark so I left it natural.

So are you ready to see my Dear Lillie copycat chalkboard?


I will certainly be able to keep better track of my grocery list and appointments with this.

The cost for everything was around $20.00.  Most of that was for the chalkboard paint itself ($10) but I have a ton of it left over for other projects so really this project was very inexpensive.  Cheaper even than buying a smaller chalkboard at Staples or Hobby Lobby and mine has a much chunkier frame than the any store bought one, which I like.

So do you like my homemade chalkboard?  Do you like it enough to make your own?  Go ahead and make one.  You know you need one...somewhere!


Have a great day!


Monday, August 4, 2014

ONE DIY QUEEN SIZE BUTTON TUFTED HEADBOARD FOR UNDER $25...

Happy Monday y'all!

Well I managed to finish the button tufted headboard for sis over the weekend. YAY!!


Though it is not perfect, it's good enough for us and I think it's super cute.  The best part...I spent less than $25.00 to make this myself.  That beats spending upwards of $300.00 for one any day, right?

Cost breakdown:

$7.65 for one 4'x8' Utility board
$2.00 for foam mattress at yardsale
$1.00 for fabric at thriftstore
$5.50 for buttons, upholstery thread and needles
$3.00 for screws
$0.00 for partial frame from an old headboard

I will admit that this was not a one person job.  I did everything myself...


until it was time to do the tufting....


The headboard was just WAY too long and too tall for my arms to reach both sides of the headboard at the same time to thread the button on, pull the thread through and staple everything down, so the hubs helped (that's why there's more wrinkles than there should be.  He didn't pull the fabric taught like I showed him), but I didn't complain because he was a really good sport to spend his free time on Saturday afternoon helping me when he would have rather been doing something else.


Secretly though I think he enjoyed working with me on this project and I enjoyed having him there to help. He's my sweetie!


And with that this room makeover has officially begun.  Now I'm ready to order some new curtains and bedding for this room.

I'm thinking the Ferle curtains from Ikea would be nice...


and I am loving this ruffle bedding...


Twin Miley Mini Ruffle Comforter Set White


I think it would be perfect.  I can't wait until I have saved enough pennies to order everything.  Of course you can be sure that I will keep you updated.


In other news, now that the headboard is done, I am working on a little project for the kitchen.  Can you guess what it will be?...


I hope to be back later this week with all the details.  See you then!


Friday, August 1, 2014

DREAMING OF AN UPHOLSTERED BUTTON TUFTED HEADBOARD...

Hello! How's your summer going?  BUSY?  Mine too...hence the lack of posts as of late.

About a year ago I showed you sis's room....


Other than a few minor changes I thought I was just about DONE with her room.  However, after living with it for a while, there are some things that we both decided needs to be changed.  Well pretty much all of it needs to be changed!

I don't like all the orange though it's sis's favorite color.  She doesn't like the picture over her bed and neither of us like the hand painted striped curtains. We like the design of them and in pictures they look GOOD but they are too stiff and look a little (maybe a lot) blotchy in real life.  Not quite the feel we were wanting.

Anyway, I envision a gray and white room with soft flowing curtains, ruffled bedding and most of all NO orange! I also envision a gorgeous, TALL button tufted headboard somewhat like this one...


Wow, is that not a GORGEOUS room?

Well as you know, upholstered, button tufted headboards can be EXPENSIVE...EXtreeeemely expensive so I have decided to make one. Surprised? Probably NOT!

A few months ago when my in-laws bought their new house they gave us their like new queen size bed for sis.  They didn't have room for it and she NEEDED a new bed, so it was a win, win situation! The bed came with a not so pretty fake oak, pressed board headboard.  I knew we would NOT be using that. However, I figured I could use part of it to make the tall white tufted headboard I had been dreaming of.

I disassembled the old headboard keeping only the frame...


then screwed a large piece of utility board that I got for $7.65 at Lowe's to the frame.


I had the handy dandy saw operator man at Lowe's make a cut for me at 65.5"...(the width of a queen size headboard) so I didn't even have to mess with digging my saw out once I got home.


Yes, I know you do all your projects in the middle of the living room floor too, don't you? Hehe.

Next, though this step is VERY HARD to see, I measured and drilled my holes for the button tufts...


Mine is not going to have quite the amount of tufting as the one in the gorgeous room above, but I think it will turn out fine.

For the padding I used a foam mattress I found last weekend at our pastors yardsale for $2.00.  What a great find and at the right time no less.  I love when that happens.  It lets me know this project was meant to me.


Have I ever told you how much I love my electric stapler? Well, I do!  I bought mine at Lowes when I was upholstering the loveseat in the living room and let me just tell you, I will NEVER be without one again!  It's beats the heck out of using a manual, hand hurting, hard to operate one any day....


And that's where I stopped...FOR NOW....

I have the perfect white fabric that I found a month or so ago for a dollar at a local thrift store and will be tackling the tufting an upholstery over the weekend...that is IF I can get the buttons I need tonight.

I hope to be able to show you the finished headboard next week. Wish me luck!

What projects have you been working on lately?  Have you ever made your own headboard?

Have a fabulous weekend! Ciao!


Blogging tips